How To Make Galvanized Planters: A Simple 3-Step Guide
Built to last, these galvanized planters add a distinct farmhouse style to any outdoor space. You’ll love the look and the functionality.
Are you itching to start a gardening adventure but do not have much room or time? Well, have I got a solution for you?! Imagine this: a beautiful galvanized bin cradling a flourishing garden that is right outside your door. Another possibility is that you are in need of a temporary vegetable garden because the soil is too damaged to grow your crops in its current state. In addition to being aesthetically pleasing, these modern planters are also very simple to put together.
The time has come for you to unleash your inner do-it-yourselfer and turn your outside area into a glorious garden! It will only take you a weekend of hard work to start growing your own little Eden. This means there is no reason to not be growing your own food. So, grab your tools and let’s dive into the wonderful world of crafting galvanized steel garden planters!
The 3-Steps to Preparing Your Steel Planters
In this guide, we’ll review the 3 steps to using galvanized bins as planters:
- Drill drainage holes.
- Position the galvanized planters and fill them with soil.
- Start planting!
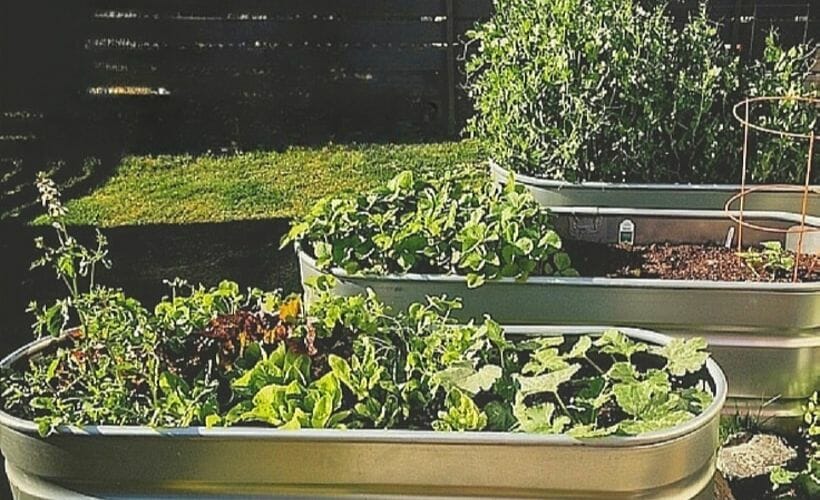
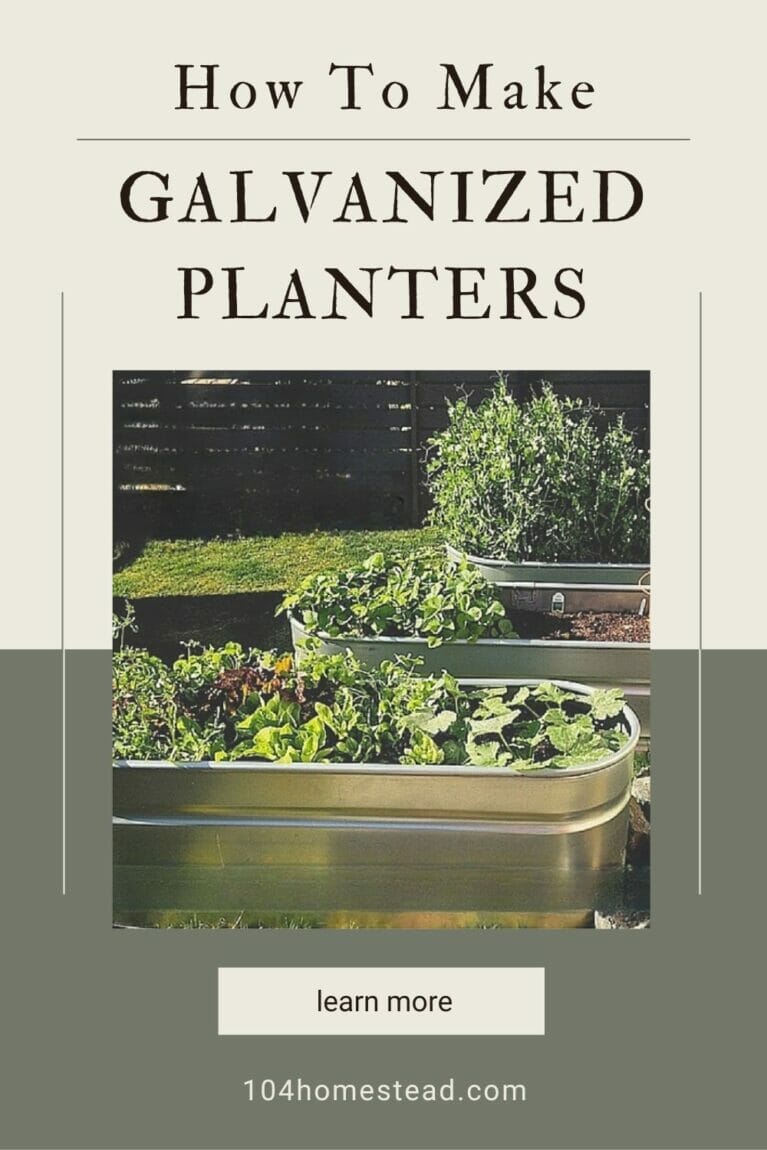
Galvanized bins can be found at your local hardware store, farm supply store, or online. They come in various sizes and are traditionally used for animal feed. Think about what size would be best for your space and for what you want to grow. The metal tub shown here are 155-gallon tanks from Tarter; they are approximately 2 feet high by 2 feet wide by 6 feet long.
Drill Holes for Adequate Water Drainage
You want to make sure the veggies you are going to plant have good drainage, so drilling holes in the bottom of the planter is important. This is not an easy job, but it’s worth it! Here’s how:
Flip the bin upside down for drilling, and put a tarp or a blanket underneath to catch the metal scraps.
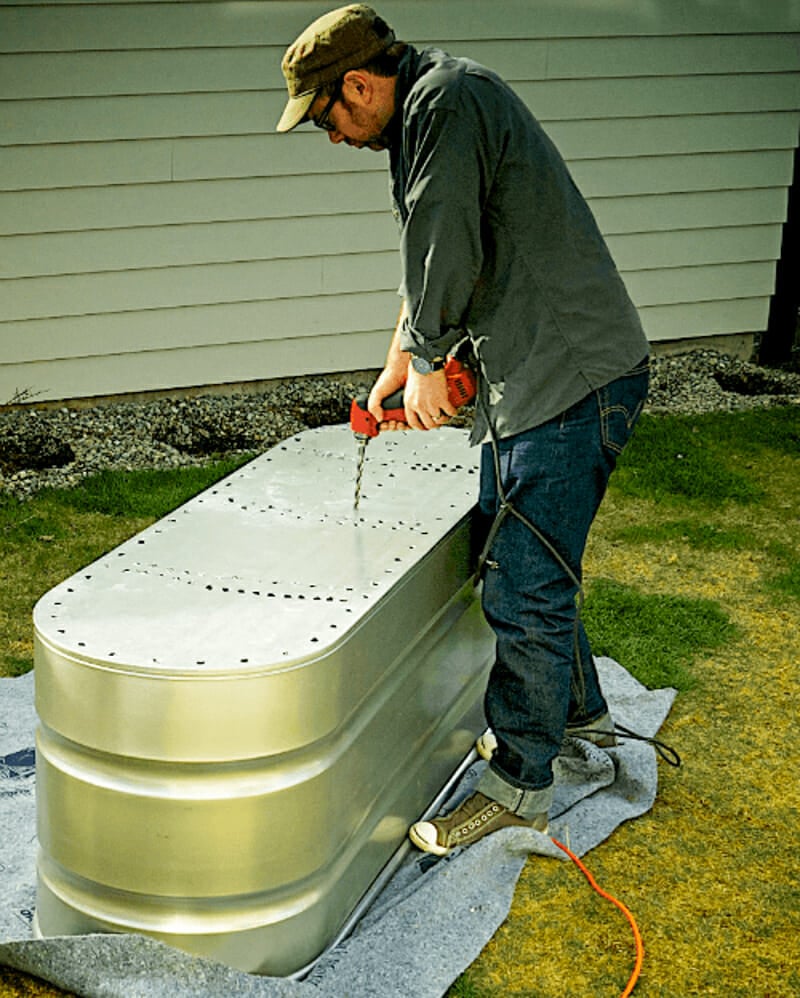
Using a 1/2-inch metal drill bit, drill holes every few inches around the perimeter of the trough, as well as across both vertically and horizontally. This will drain the battery from a cordless drill quickly, so a corded drill might be a better option if you have one.
Position Your Galvanized Planters & Fill Them with Soil
These galvanized planters are a great addition to a patio, deck, or yard. If you want your bins in a specific location, you can measure and mark the specific spot. When placing the bins, take the time to make sure they are level, which is important for drainage. Remember that once the bins are full of dirt, they will be fairly permanent because of their weight (though you can always empty the dirt out to move them).
For soil, we recommend using a blend of 2/3 high-quality topsoil and 1/3 compost. Your local landscape/garden center can probably deliver this by the yard (even better if you have a truck and can pick it up), and then you can shovel it into the bins.
Fill your galvanized bins to the very top with the soil/compost blend! Keep in mind that the soil will settle, and stopping even just a few inches from the top of the bins will create a gap that will cast a shadow on your plants.
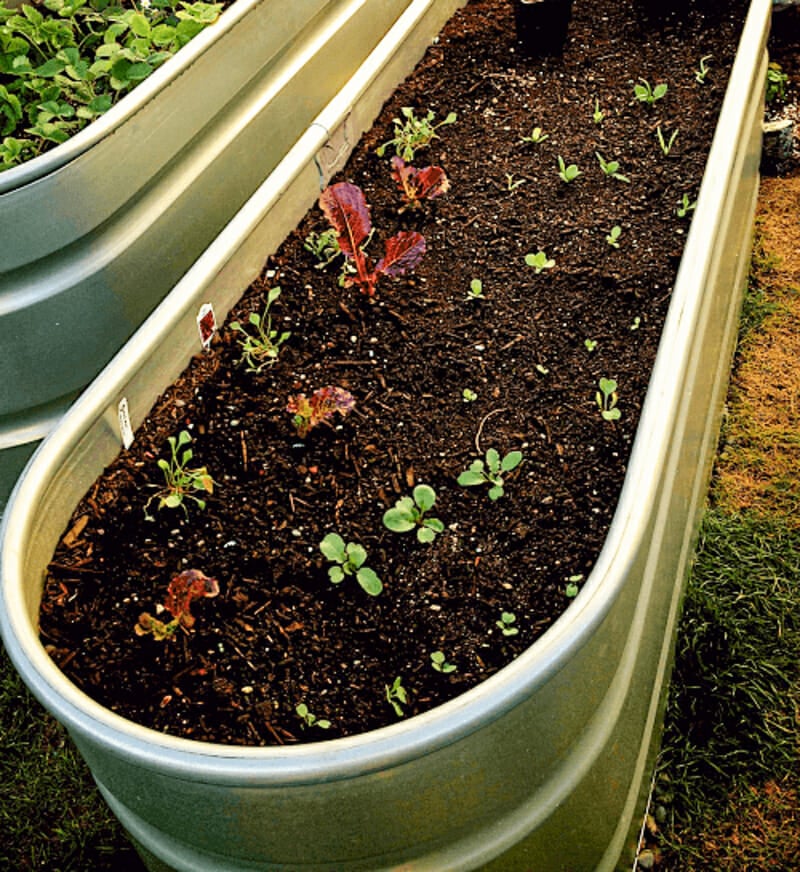
Start Planting in Your Metal Planters!
Now you’re ready to plant, which is the fun part! Herbs do very well in these galvanized planters. Snap peas and lettuce are examples of cool-season vegetables that can be sown directly in galvanized planters. Cherry tomatoes and summer squash are examples of warm-season vegetables that can either be started indoors or purchased as seedlings. You can mix and match – starting with some direct sowing early in the season and adding other seedlings and warm-season veggies as the season progresses.
If you need help with hardening off and transplanting your seedlings into your new planters, here is your guide on how to do it.
Do galvanized planters get too hot?
You may be a bit concerned that your poor plants are going to cook when the sun shines on your planter, but fear not, the galvanized containers will reflect heat. The damp soil also creates a cooling effect that will prevent roots from getting too warm.
Is it safe to plant in galvanized tubs?
“Galvanized containers have a zinc coating (which can contain cadmium) which prevents the underlying steel or iron from rusting. If you have these containers for a while, or if your soil/water is acid, the zinc coating can corrode, and the zinc and cadmium can be released and uptaken to your plants. So this would be a major consideration if you were planning on growing veggies for your family in the galvanized containers. Small amounts of zinc help your immune system but large amounts of zinc and any amount of cadmium can be poisonous.”
– Vicki Motz, National Institute of Food and Agriculture
If you have acidic soil or water and you start to see wear and tear, it may be best to retire your planters from food production to ornamental plants.
How long do galvanized planters last?
Galvanized planters can last for an average of 25 – 60 years. The lifespan of a galvanized planter depends on how well the planter was cared for. Wipe down your galvanized steel planter with a damp cloth to remove dirt. Don’t use any detergents or soap as this may remove the patination oils.
For inspiration on garden planters you can make yourself, check out these cute DIY garden containers.
Adding a touch of rustic farmhouse style to your outdoor area, these long-lasting galvanized planters are perfect for all your gardening needs. Whether you are short on room or have soil that needs fixing, these multipurpose containers are perfect for growing your very own garden. What are you waiting for?
Now, I’d love to hear from you! Are you inspired to try your hand at crafting these galvanized steel garden planters?
I started buying these a couple of years ago. I have 2- 6ft. troughs, 3- 4ft troughs and 6 of the 17 gallon round tubs for my garden. These are the best solution for me, less bending over as they stand 2 ft. tall and the tubs are sitting on foundation blocks to raise them up. My last couple of seasons have been quite plentiful with wonderful veggies!
For hot climes it strikes me that you should be able to easily skirt the galvanized tubs w/ burlap, thin foam sheeting, wood/bamboo privacy screening, mesh sun screen fabric, etc.—basically anything to create an air gap to insulate the tubs metal surfaces from direct radiation from the hot sun. Bungee, band, rope or whatever to hold it in place; change it out when it weathers.
Sounds like more fails with galvanized than success
CAN YOU PLEASE HELP ME IN HOW CAN I USE BIRD NETTING AND HOW TO SUPPORT THE NETTING WITHIN THE GALVANIZED BINS. THE BIRDS ARE EATING EVERYTHING. IT’S VERY DIFFICULT TO WATCH. I HAVE SIX QUITE LARGE BINS.
THANK YOU SO MUCH
Not sure if you found something yet, but here is a great video instruction that 8s easy and cheap to put together. Happy planting?
Watch “4 Cheap & EASY to Make Raised Garden Bed COVERS” on YouTube
https://youtu.be/x83ZwRHaDi4
Redwood tree roots from neighbor’s radiate, of course, in all directions including 25 feet into our yard.
They come into our wood framed raised beds (built at least 25 years ago) and totally thrive in the well amended soil. Their root mass is thick and filamentous competing for nutrients and water. Our beds set ddirectly on the earth are bottomless frames (4 ft X 15 ft) with 2 X 12 boards
and with wire bottoms (moles) of 1/2 inch galvanized hardwear “cloth.” Every 2 years we have to remove ALL this
planting mix and cut out the roots. Since these old frames are rotting after 25 years we are considering rebuilding with
3 or 4 inches of AIR SPACE beneath a frame with a bottom and drain holes. We are considering using Hardy Board (1/2 inch X 4ft X 8 ft) for
the bottoms and all 4 sides. We have too many beds to pave the whole area. So we would have to place these new beds on
3 to 4 inch spacers (bricks, etc. or 4in X 4in wood beams. Aesthetically/financially approximately 10 galvanized water tanks do not appeal
Thank you for any suggestions, Tim Sullivan, Northern Calif.
How will these be winterized for zones in sub zero temperatures?
Doesn’t the sun scorch or “cook” the plants because of the thin walls and metal to soil heat transfer? Do you simply water more often?
You would need to water more often, mostly because containers seem to dry out faster. Metal containers might not be suitable for very hot climates, but they are amazing for those of us further north. We can often push our zone limits a bit with the heat from metal containers.
We live in the high desert of Central Oregon in Redmond. We bought two large troughs, drilled drainage holes, filled with compost and dirt and have installed drip lines. For some reason we cannot get anything to grow in theses troughs. This year we replaced the dirt and are trying again. We are still having problems getting anything to grow. We do not understand what we are doing wrong. Went to a considerable amount of time and expense to have them fail. We cannot figure it out. Any help would be appreciated.
Maybe the sun heats up the metal and the soil gets too warm, affecting the roots or killing soil microbes that help plants grow? Just a thought as I was concerned about this.
I have the exact same problem. My first attempt, I planted plants that were already about 12” tall. They took off! And then they died. All of them. Second year, same result. There are two solutions I am considering. The first is, obviously, moving them to a place in the yard that only gets partial sun. I am treating this as the last resort. My second option is to berm the sides of the planters with earth and then plant ground cover, likely strawberries. I know that part of using the trough planters was to enhance a rustic look putting berms around them defeats that purpose, but for now, that’s t best option I have to keep them i sun and not roast the plants.
Watch videos from Epic Gardening and Self Sufficient Me. They both use Birdies raised galvinized raised beds almost exclusively and are in San Diego, Califorina and Subtropical Austrailia respectively. They have not mentioned anything about scalding, cooking or heating up too much.
I’ve tried for several years gardening in galvanized bins and unknowingly followE the instructions given and never have I gotten a decent crop or even 1 healthy plant out of any time I try. This year I’m going to try again using another kind of pot with the same plant, variety, planted in a galvanized bin and put the two next to each other and see what happens.
This sounds like a good experiment! For veggies, make sure the area you’re placing the bins in are getting 6-8 hours of full sun per day.
I use countryline 2x 4 x2 tank on bricks but the difference is I used the wicking system . Collected about 19 gallon milk bottles with cap, put two holes near to & two up from the bottom of the gallon. The only whole I have in the tank other than the plug it came with is the hone hole I drilled exactly 5 inches up from the bottom of the tank facing out.
I put the plastic bottles in then landscape cloth that water can go thru on top of bottles then before putting in my soil mix I put a pvc pipe with an angle cut on the bottom of tank, throughly 3+ft long on the edge nestled in, filled the soil up to about 4 inches from top then the boring part – fill with water thru the pvc pipe until you see water coming out that small hole you drilled 5 inches up. FINALLY water com8ng out you are set to plant. Live in Zone 6 RI rarely had to water, again you just put water in until it comes out that small whole. The tanks are not cheap but great for the wicking system, look it up on youtube, very interesting!
Something to consider……Paint the bottom inside and out with rust inhibitor paint such as Rust-Oleum.Because once you perch the Galvanize coating it will rust resulting in shortening the Bins life.
This is an interesting suggestion, just make sure the Rust-Oleum would be safe for your soil and the plants you’re growing in the bins. We’ve had ours for several years and they are still holding up great with no treatment!
Can you tell me where I can buy these galvanized bins?
Hi! You should be able to find them at a local hardware store or garden/farm supply center. It might be a good idea to call around – they are referred to as galvanized bins or steel troughs, and they are traditionally used for animal feed. You can also find them online, but I’m not sure how shipping would work for something that work. I hope this helps!
I have been told that the very process of making them “galvanized” makes them unsuitable for growing food in. Can you comment?
This is a great question and something we were concerned about when first considering using galvanized bins as vegetable planters. The concern is about zinc, which, while the fumes can be harmful during the manufacturing process, is not harmful as a container for growing food. Hopefully this helps ease your concern!