How to Revive a Neglected Sourdough Starter (Even After Months)
Forgot your sourdough starter in the fridge? Here’s how to revive it, spot the real warning signs, and get it bubbling again with simple, reliable steps.

If you’ve ever opened the fridge, spotted a jar wedged behind the pickles, and thought, ‘Oh no… that’s my starter,’ you’re in good company. I’ve revived starters after a week, after a month, and once after a stretch so long I honestly couldn’t remember the last time I fed it. Life happens. Gardens explode, kids need rides, you get sucked into barn cleaning, and suddenly it’s been ages since you last baked bread.
The good news? A neglected sourdough starter is almost always recoverable. It just needs a clean jar, a couple of steady feedings, and a little patience. I’ll walk you through exactly what I do to bring my starter back to life, how to know when it’s too far gone, and how to keep it healthy going forward.
Why Your Starter Survives Neglect More Than You Expect
Most people assume they’ve killed their starter the moment it stops bubbling or develops that slightly questionable grey layer on top. But sourdough is tougher than it looks. Underneath the hooch and crusty edges, the yeast and bacteria are basically on pause, just waiting for you to feed them again.
Most of the things that freak people out (the weird liquid on top, the sharp smell, the dull color) aren’t anything to worry about.
What Happens When Your Starter Sits Too Long
After a long stretch unfed, your starter goes through a few predictable stages:
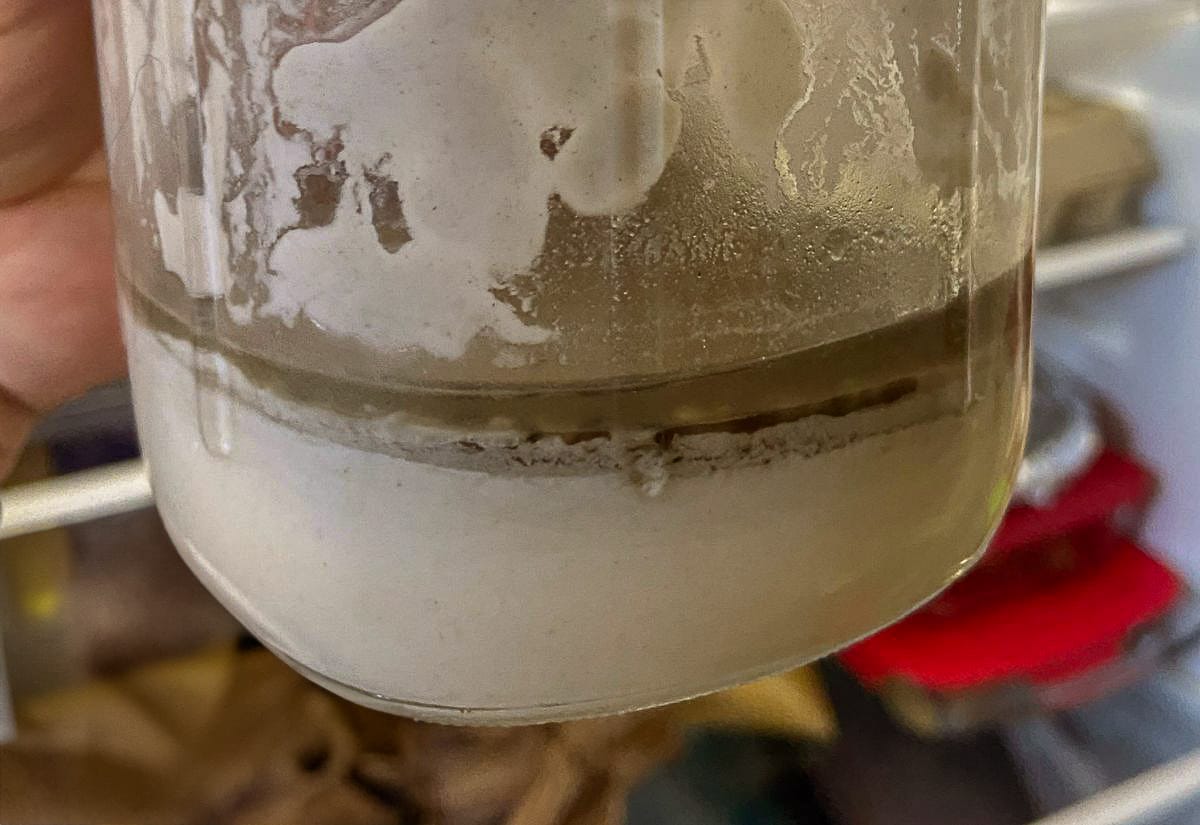
- Hooch forms. This is the watery, sometimes greyish liquid on top. It’s a sign your starter is hungry, not dead.
- It loses its rise. No bubbles, no activity, no doubling. Everything goes quiet.
- The smell changes. Instead of yeasty and bright, it might smell like alcohol or even vinegar.
- It separates. The flour settles on the bottom and the liquid moves to the top.
And here’s the good news. All of that is salvageable.
When Neglect Crosses Into “Please Toss This” Territory
There are only a few true signs that you need to start fresh:
- Pink, orange, or streaky discoloration
- Actual fuzzy mold
- A rotten, hit-you-in-the-face smell before you even get the lid all the way off
If your starter has ever had a toddler’s sippy cup left in a hot car in August… that’s a no from me. Everything else is usually a quick revival.
What My Worst Starter Rescue Looked Like
Last summer, I tucked my starter into the fridge while juggling the garden, the hatchery, and the farmer’s market. Weeks passed. Then months. By the time I remembered it, the jar looked… gross.
It had a thick layer of hooch, a dried ring around the top where overflow had glued itself to the glass, and absolutely zero activity. But it wasn’t discolored, and it didn’t smell rotten, so I rolled up my sleeves and got to work. Three days later, it was rising like nothing had ever happened. Honestly, sorcery.
You don’t need a perfect track record to keep a thriving starter. You just need to know what to do next.
How to Revive a Neglected Sourdough Starter (Step-by-Step)
Reviving a starter takes a little patience, but the process itself is simple. Here’s how I bring mine back.
Day 1: Give It a Fresh Start
You’re just trying to wake it back up.
- Pour off the hooch (or stir it in if you prefer more tang — I stir most of it in).
- Scoop out a couple spoonfuls of the cleanest-looking portion and move that into a fresh jar.
- Add equal parts flour and water and mix until smooth.
- Leave it at room temperature for 24 hours.
If it was deeply neglected, it probably won’t show much activity today. Don’t worry if nothing’s happening yet.
Day 2: Feed It Again
Today you’re feeding to build strength.
- Discard about half.
- Feed with equal parts flour and water.
- Keep it warm. Starters wake up faster around 75–80°F.
You may see some bubbles or a little rise. Any little bit of activity is a good sign.
Day 3: Double Down
By now you should see bubbles, a better smell, and maybe a little lift in the jar.
- Feed again.
- Repeat the process twice if it looks sluggish.
When it’s fully revived, it should double in size within 4–6 hours of feeding. If it’s not there yet, keep going.
Day 4–5: Back to Normal
Most starters are fully revived by this point. It should have:
- A pleasant, slightly tangy smell
- Steady bubbling
- Predictable rise and fall after feedings
- A creamy consistency
Once it doubles reliably, you’re back in business.

A Low-Maintenance Revival Method (For Busy Weeks)
This is the method I use when life is chaotic and I’m not baking soon but still want to save the starter.
- Clean jar.
- Spoon in a little of the old starter.
- Add flour and just enough water to make a thick paste.
- Let it sit out for a few hours.
- Tuck it back into the fridge with a loose lid.
This takes longer to fully revive (often a week instead of a few days) but it works beautifully when you’re stretched thin.
How Revival Affects Your Bread (and What to Expect)
A freshly revived starter can behave a little differently at first. I notice:
- The first loaf may rise more slowly.
- The flavor is often milder until it stabilizes.
- The crumb might be a little tighter.
After a few steady feedings and a bake or two, it usually settles back into its normal routine.
If your first loaf after revival looks a little different than usual, that’s completely normal. A few steady feedings will bring the strength back. In the meantime, these are the bread-baking tips that help me get more consistent results, no matter where my starter is in its cycle.
Once it’s rising like it should again, it’s a great time to make something simple that doesn’t need perfect rise just yet. These donut holes are a fun way to use that refreshed starter and ease back into baking without expecting too much from that first loaf.
How to Keep Your Starter Healthy Going Forward
I’m a big believer in simple habits, not rigid schedules.
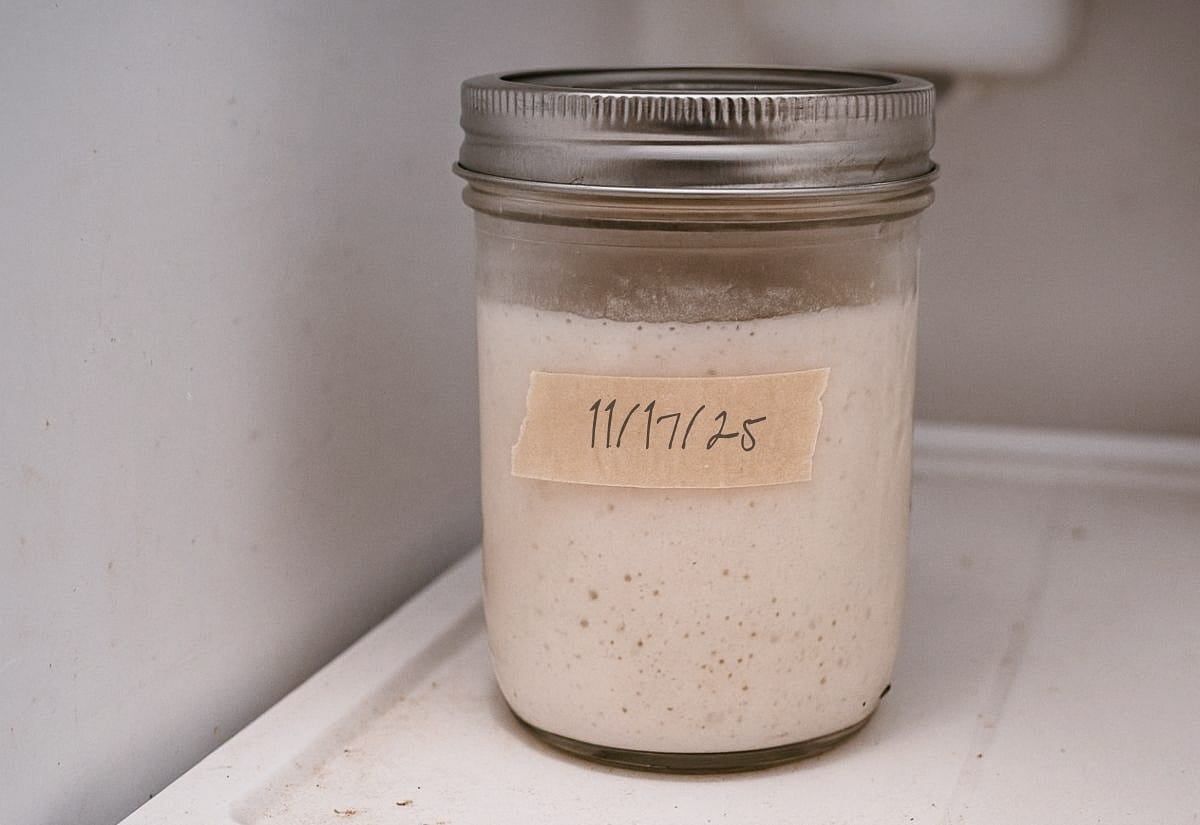
- Mark the last feed date on the jar with a little piece of tape.
- Keep it where you can see it in the fridge so it doesn’t vanish behind the leftovers.
- Give it a good feed before you head into one of those seasons (holidays, gardening, canning) when you know you’ll forget about it.
- Don’t overthink it. Starters are more forgiving than the internet makes them sound.
If you want an easy way to keep track of feedings, temperatures, or the little changes you see, my Sourdough Starter Log & Care Guide makes it really simple. It’s a printable you can keep on your fridge or tuck into a kitchen binder, and it covers daily feedings, weekly and monthly check-ins, and common issues you might run into.
Keeping a starter going is easier when your kitchen setup actually helps instead of getting in the way. If you’re building up your homestead kitchen, here are the tools I rely on in my own kitchen that make everyday kitchen tasks (sourdough included) a lot easier.
Sourdough Starter Revival Questions, Answered
Still have questions? Here are a few things people often ask after reviving a starter.
Pin this so you can find it again the next time your starter gives you that ‘it’s been a while’ look.

Keeping a sourdough starter alive isn’t about perfection. It’s about working with whatever your kitchen looks like that week and giving it a little care when you can. Whether yours sat forgotten behind the pickles for a week or several months, you can almost always bring it back to life with a few steady feedings and a clean jar. And once it’s bubbling again, you’ll be glad you didn’t toss it at the first sign of trouble.
If you revive yours after a long stretch, I’d love to hear how it goes.