Why Swales Work So Well on a Homestead
Swales are an amazing permaculture implementation for your homestead – It’s a designing system that work harder than you do.

As a teacher (and forever a student) of Permaculture, I admit I become embarrassingly giddy while peeling back the layers of one principle or technique that seem to encompass that entire design science. To me, a swale is one such technique and is a quintessential Permaculture microcosm all its own. Swales store and use energy, apply a small and slow solution, use edge, value the marginal, create innumerable microclimates, and can scale up or down depending on your landscape. My schoolgirl-like giddiness for this simple technique overfloweth since a swale is a manifestation of my own goal for Permaculture implementation – Designing systems that work harder than you do.
I’ll stop there, but trust me when I say I could go on (and on, and on, and on, if you were to ask my wife) exploring the nuances of swaling. So please forgive that introduction which I know reads like a gushing man-crush… and I guess we should go ahead and start from the top.
What is a Swale?
Simply defined, a Swale is a Ditch dug-on Contour that captures water so it can slowly soak into the land. We are all probably familiar with a ditch. Well then, what the heck does “on contour” mean? The easiest way I have found to understand this concept is to think of a topographical map, which depicts changes in elevation.
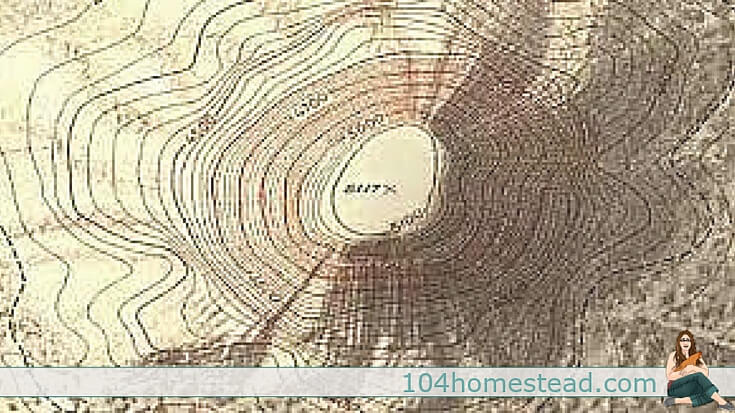
Above is a representation of a hill. The oval shape in the center is the highest spot, and each larger oval surrounding that peak is a contour line down the slope of the mountain.
Any specific spot on one oval contour line is at the exact same elevation as all the other spots on the line. That means one of those lines, a contour, is dead level. Yes, even the weird squiggly-looking ones further downhill. So if you were to dig a ditch on contour and fill that ditch with water… the water would sit there as if in a perfectly level trough.
That’s a swale.
Allow me to don my imagination cap and dig four swales on the western slope of our magical Mt Watershed.
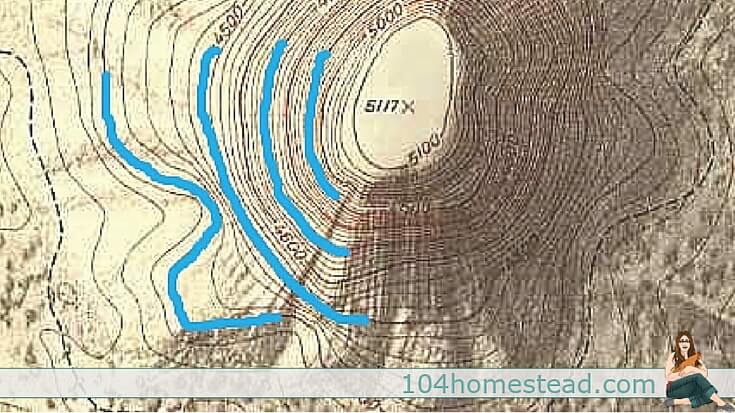
Water flows downhill and is captured in the topmost swale. When that swale’s capacity is full, water begins to overflow at a specific place we designed (called a sill) and continues downhill into the next swale. Water catchment continues in this manner until as much of a rain event as possible is held. This capture slows the velocity of water runoff, greatly reducing erosion, and allows all that moisture to seep into the landscape, hydrate the soil and subsoil, and eventually work to replenish groundwater stores.
On a smaller scale more applicable to our backyards, swales almost negate the need for active irrigation in many scenarios.
I don’t know about you, but this passive water harvesting technique sounds much more appealing than dragging hoses everywhere, carrying heavy watering cans, and installing expensive irrigation systems. Why… that all sounds like work!
So now that we have a high-level image, let’s drill down and look a little closer. Here is the quintessential depiction of a cross-section of a swale included in many texts.
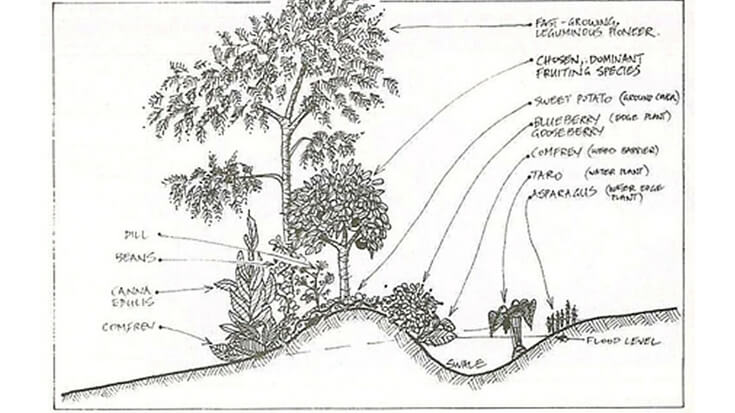
“Uphill” is to the right of the diagram and water flows “downhill” towards the left.
When digging a swale, you pile the excavated soil into a mound on the downhill side of the ditch. That mound is the first to be hydrated, and therefore an ideal place for planting (which is depicted above and a lengthy topic for another day).
Sounds cool. How can I get one?
Great question. How do we apply such a technique to our own landscape? It’s easier than you might think.
First, determine a contour line where you want to install a swale. You can either purchase a very pricey laser level used by architects and civil engineers that does the work for you… or, you can follow my penny-pinching lead and build a more traditional tool: the A-Frame Level.
- Cut two identical pieces of scrap wood and attach them to make up the legs.
- Attach a horizontal brace in the middle so the frame looks like a capital letter A.
- Tie a piece of string to the top of the A-Frame.
- Attach some form of weight to the bottom of the string. (Yes, my weight could’ve been 12 fluid ounces weightier… but it’s not!)

Once built, calibrate the A-Frame Level…
- Pick any spot to hold the A-Frame and mark the ground where both legs rest.
- Mark a line on the horizontal crossbar where the string crosses it.
- Turn your level 180 degrees so each leg is now touching the ground mark where the other leg was initially.
- Mark a line on the horizontal crossbar where the string now crosses it.
- Measure the distance between the two marks on the crossbar.
- Mark exactly halfway in between the two marks on the crossbar. THAT is dead level!
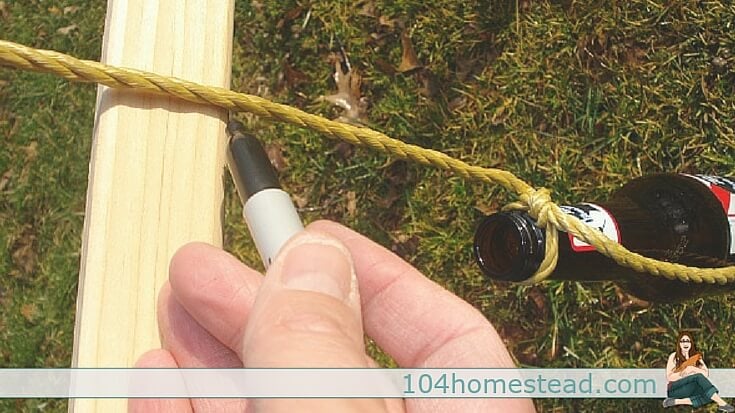
Now anytime your string is dangling over your level mark, you can be certain the two spots where your A-Frame’s legs rest are on a contour. Mark those spots with something and continue on with your A-Frame to find the next level spot.
Here is part of a contour line in my garden area I marked after raiding my kid’s art supply box for popsicle sticks.
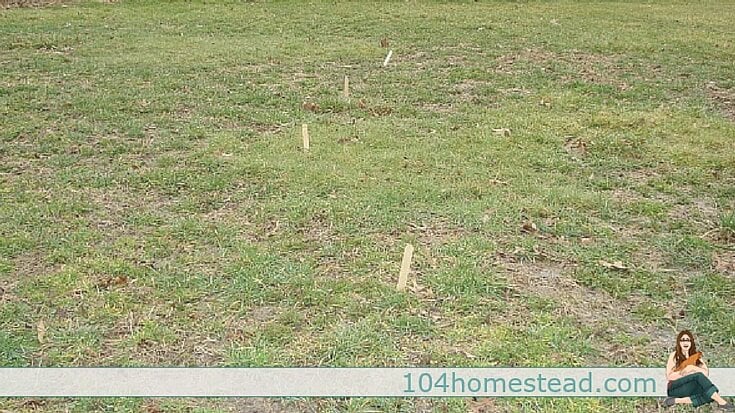
Standing back and looking at this area, it’s very difficult to tell there’s a slope on this seemingly flat part of the yard. Yet my A-Frame found it.
Now we have a contour line. We’re all set to dig a swale as described above and plant it into the downhill mound. One note, if you’re looking to hire an excavator to install very large mainframe swales (as I’m designing for about 2 acres in my front yard), make sure you interview the operator and that he fully understands what you’re trying to do. An off-contour ditch doesn’t do you much good.
But back to smaller scale stuff…. as for me and my garden, I decided to kick things up a notch and stack a few functions. I built wood-core Hugelkultur beds on top of my swales as I wanted the water harvesting (and other) benefits of both techniques. If you’re not familiar with Hugelkultur, Jessica wrote a nice introduction you should read it here.
Building a Hugelkultur Swale
Mark your contour line as shown above. Dig your swale on a contour. I decided to go about ten inches deep.
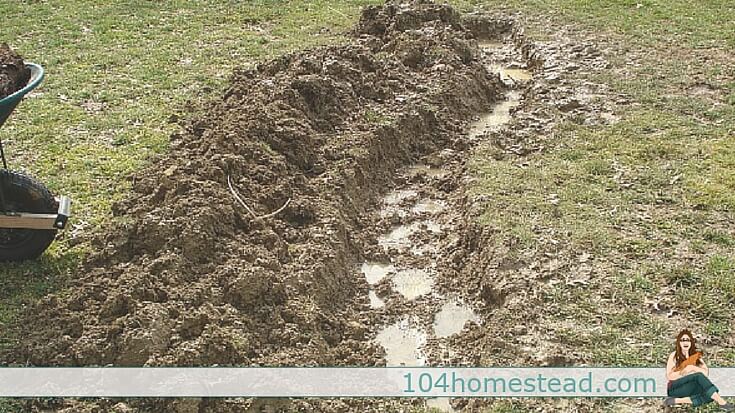
Fill the swale with wood. Slightly rotted is ideal.
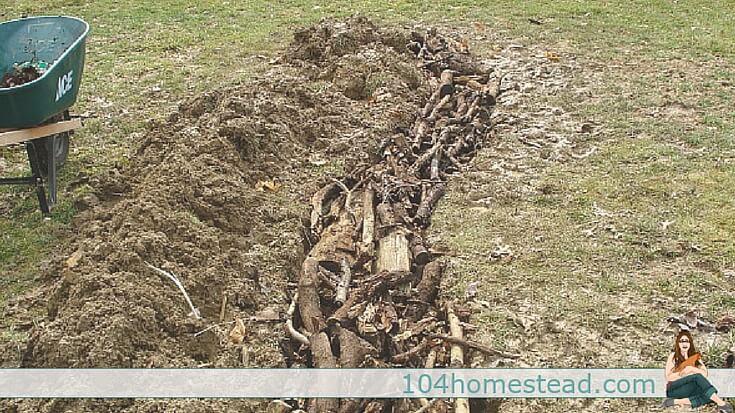
Cover the wood core with topsoil and compost. I used alternating layers for a Sheet Mulch or Lasagna Layering effect.
Finish with four to six inches of deep mulch to help retain all the moisture your Hugel Swales will capture. Rain moves down a slope and is captured by the swale and is absorbed by the wood core to be released as needed during drier times.
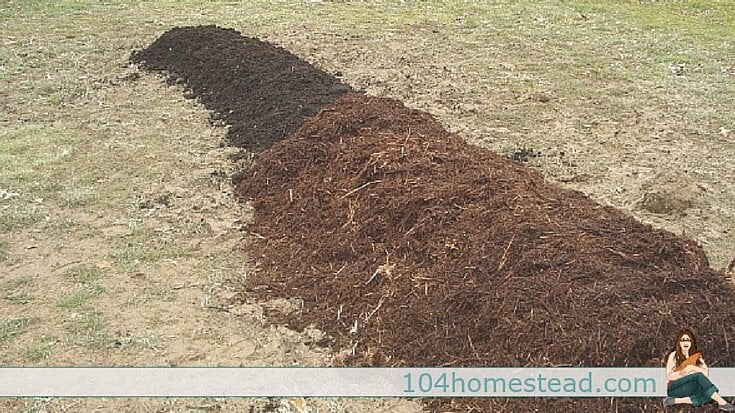
When finished, move downhill and add a few more Hugel Swales to maximize your catchment and minimize your irrigation workload!
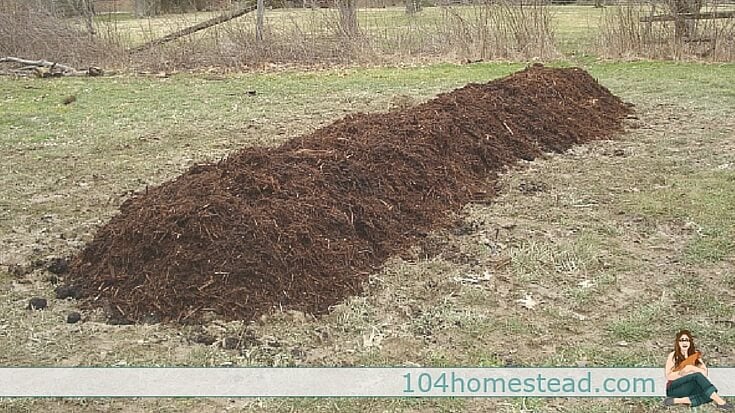
Again, huge thanks again to Jessica for letting me stop by, and if you have any questions or something I might be able to help with, please don’t hesitate to comment below.
If you’ve found value in this blog post and enjoyed reading it, why not share it with your Pinterest community? Pin the image below and spread the love!

Hey! I’m in SC Ohio and getting ready to move into a place that has a natural (albeit small) “waterfall” or run off in the middle of the yard. I am wondering how to work with this using the swale technique. Do you have any advice on that? Obviously we know where the drainage is going but I just don’t know how to work it into a self watering garden, which is my goal. It’s a small yard and I’m looking to build a “potager” type garden with veggies and flowers. Help if you can!!
Hi there! Since you are a teacher maybe you can answer a question I have been trying to find the answer to for months! I have a young avocado orchard in the subtropical Andes mountains. Interplanted with freijoa etc. . i have about 30 cm of loam then varyiñg degrees of clày base. Not sure of the degree of slope, but its steep enough to get a good workout walking around, but not so steep that the land is unstable. As you say, swales are wonderful. But with 1500 mm of rainfall I question if the soil would oversaturate, possibly become unstable, and cause rootrot in the avocadoes? I would really appreciate a little advice on this! Thanks Jessica.
C
Gday mate, I’m thinking of doing a hugelkultur x swale(ditch) on our property. As we have a lots of wood I was thinking of innoculating these logs with mushroom spawns and laying them out on contour on a 5 acre block with a gradual slope. I could then hire an excavator to dig out the soil on the hillside to form the swale and dump the soil on the logs creating a hugelkultur 2mtr high. My question is would I need to bury the logs in the soil or would it be alright to just lay them straight on the ground and then dump soil on top, also how deep must the swale be and how wide. From what I’ve read in other sites they think the water from the swale would wash out the hugelkultur, but considering we only get an average of 700mm of rainfall a year and the slopes aren’t that steep do you think doing this method would alright.
I’m in a low precipitation area and built much larger swales. After quite a bit of experimentation I’ve found planting in the swale is better than on the berm for our needs. So I’d encourage people to experiment and not take any one illustration as correct for this. It is so dependent on area and needs. Don’t give up if it doesn’t seem to be working like you wanted! Good luck!
Great advice. Thank you for sharing your experience.
Just wondering…what did you do with the dirt that you dug out of the ditch?
For my conventional swales, I mounded the removed dirt on the downhill side of the swale troughs to form a mound that I’m planting into.
On the less conventional Hugel-Swale shown at the end of this post, I piled the dirt right back on top of the buried wood, in lasagna-style layers with several layers of compost, organic matter (chicken litter bedding), and the dirt… then rough wood chip mulch on top.
Can I use driftwood collected on the beach to fill my Swales?
Thanks
I’m not really sure Alex. Yes, it’s organic matter, but I worry about residual salts. Maybe if you soaked it first like you do when you amend your soil with seaweeds.
Hi Alex, Sorry to go all semantic-nazi on you for a second before I answer, but I want to make sure that the distinction is clear between a swale (ditch dug on contour), and a hugelkultur bed (a mound or bed that has a buried core made up of wood). Yes, at the end of this article, I showed a combination of those two very different techniques. Typically you don’t “fill” a swale with anything, besides collected rainwater.
But to give an actual answer to your question that’s practical, I would venture to say Yes, but I’m right with Jessica on wanting to know how much salt is absorbed in driftwood. “Salt the earth” isn’t just a catchy expression. It’s a serious concern. I’m far from a coast, so I can’t speak too much on that subject. Good luck!
Where are you located (how much rain do you get?). Is this worth doing in Colorado where it’s pretty dry?
Hi Fiona, I’m located in SW Ohio, Zone 6a. Our average annual rainfall is about 39-41 inches.
Swales are absolutely ideal for drier climates. I know CO is diverse and I don’t know where you are, but overall you likely have less precipitation than I do, so you’d likely see more of a positive impact compared to me. Especially if you have some slope to your land. I hear the Rocky Mtns sometimes provide that. 🙂 With CO’s elevation changes, rain events usually never get a chance to soak in on a large scale. They’re rushing away down hill, picking up contaminants, plus erosion speed and force, just to rush down sewer drains and ultimately flood everything downstream. We should slow that water down, keep it as long as possible, and give it a chance to work for us.
If you want to really become a believer in what swales can do for dry locations, do a search for Geoff Lawton and/or “Greening the Desert”. Thanks to these kinds of techniques, folks were able to turn a completely barren desert wasteland in the Middle East into an abundant food-producing green oasis.
So yes, it’s most likely very worth doing depending on your situation. One thing though, I’m not sure of your laws, but I know that CO is one of the few states that has wacky (and environmentally detrimental) laws banning rain catchment from your roof. So you might want to do a little research to see if this falls in a similar category??? It’s preposterous to me to have to worry about that, but I’d hate for some jack-booted H2O Monitoring Brigade to roll up on your Homestead in armored personnel carriers. Of course, looking at my finished Hugel Swale above, it just looks like a raised bed, doesn’t it? I digress….
I’ve gone way too long already, but in case anyone is wondering, swales are also a beneficial technique in places that are “too wet”. I’m not talking perpetual FL boggy swampland (they don’t typically need to harvest water), but places like where I am with clay soil. When we get huge spring deluges, each yard usually turns into several small lakes for a few weeks. Swales and especially Hugelkultur improve that situation by taking the standing water, holding it where we want it, and letting it soak in over a larger part of our land we dug to snake around on contour… compared to a ton of deep standing water in a small low spot in our yard that takes forever to soak in (or evaporate).
Hope that helps!
That is simply rockin awesome!!! Thank you for the great info; can’t wait to implement these ideas on our new homestead. We’re leaving Utah for Missouri and one of the things I’m looking forward to is having trees again!!!
Hey Tessa, good luck with the move! The great thing about living someplace like Missour-ah (see what I did there?) is old, slightly rotted wood is easy to come by. I’m betting you’ll find ads where people are begging you to cart it away… Or contacting local tree-trimming companies could net you a lot of scrap wood for free Hugel Swales.
Hope it all goes well for you!