10 Tips for Growing Lush, Bountiful Tomato Plants
Grow lush, juicy tomatoes with these gardening tips. Discover my secrets to growing healthy plants and getting bountiful tomato harvests.

Nothing transforms a garden experience quite like the vibrant, tasty promise of homegrown tomatoes. These sun-loving fruits are not just a staple in culinary creations; they embody the spirit of home gardening. Whether you’re a seasoned green thumb or a budding gardener, mastering the art of growing tomatoes will transform your garden and your kitchen.
Here, I will show you the ropes and spill the beans on how to take your tomato game to a whole new level.
Be sure to check out the ultimate list of things that go in the hole before you put in the plant from Grow Better Veggies.
Choose the Right Support
Picking the correct tomato support system is essential. Whatever method you choose—staking, caging, or trellising—influences every aspect of plant management, from spacing to pruning.
Staking
- Pros: Saves space; improves air circulation
- Cons: Requires regular tying and pruning
Caging
- Pros: Less maintenance; supports free growth
- Cons: Takes up more space; cages must be sturdy
Trellising
- Pros: Great for large gardens; facilitates easy harvesting
- Cons: Installation can be complex and time-consuming
Determinate tomatoes, often called “bush” tomatoes, are great for a bountiful harvest because they stay at a constant height and yield all of their fruit at once. In contrast, indeterminate tomatoes provide a continuous harvest because they keep going strong right up until frost.
Based on my experiments, I have determined that caging provides the most versatility for different garden layouts, so I can easily scatter tomato plants all over the place. When growing indeterminate tomato plants, trellising is your best bet for crop control. Removing suckers also helps maintain control of your tomato plants.
Ensure Full Sun Exposure
Tomatoes aren’t just sun-lovers; they thrive on it. Ensuring they get full sun is non-negotiable for healthy growth and fruitful harvests. Tomatoes require at least 6-8 hours of direct sunlight daily. Cherry tomatoes might be more forgiving, but don’t compromise on sunlight for the best results. Use a Light Intensity Meter to measure your garden’s sun exposure accurately, and learn about your soil’s health. Another option is to create a sun map of your garden before the season begins.
Preheat the Soil
Warm soil is like a cozy bed for tomato seedlings. Lay down black or tomato-specific red plastic to heat the soil, especially in cooler climates. Red mulch has been shown to increase yields by reflecting beneficial wavelengths to your plants—a simple trick with a significant impact.
Tomatoes grown on red mulch produced a 20% increase in number-one fruit compared to black mulch. However, over the years, tomato response to red plastic mulch has been variable, and the average yield increase is only about 10% greater than that of black. The change in vegetable crop yield in response to the different mulch colors is due in part to an increase in soil temperature and the range of reflected wavelengths produced by individual mulch colors.
-PennState Extension
Plant Starts Sideways
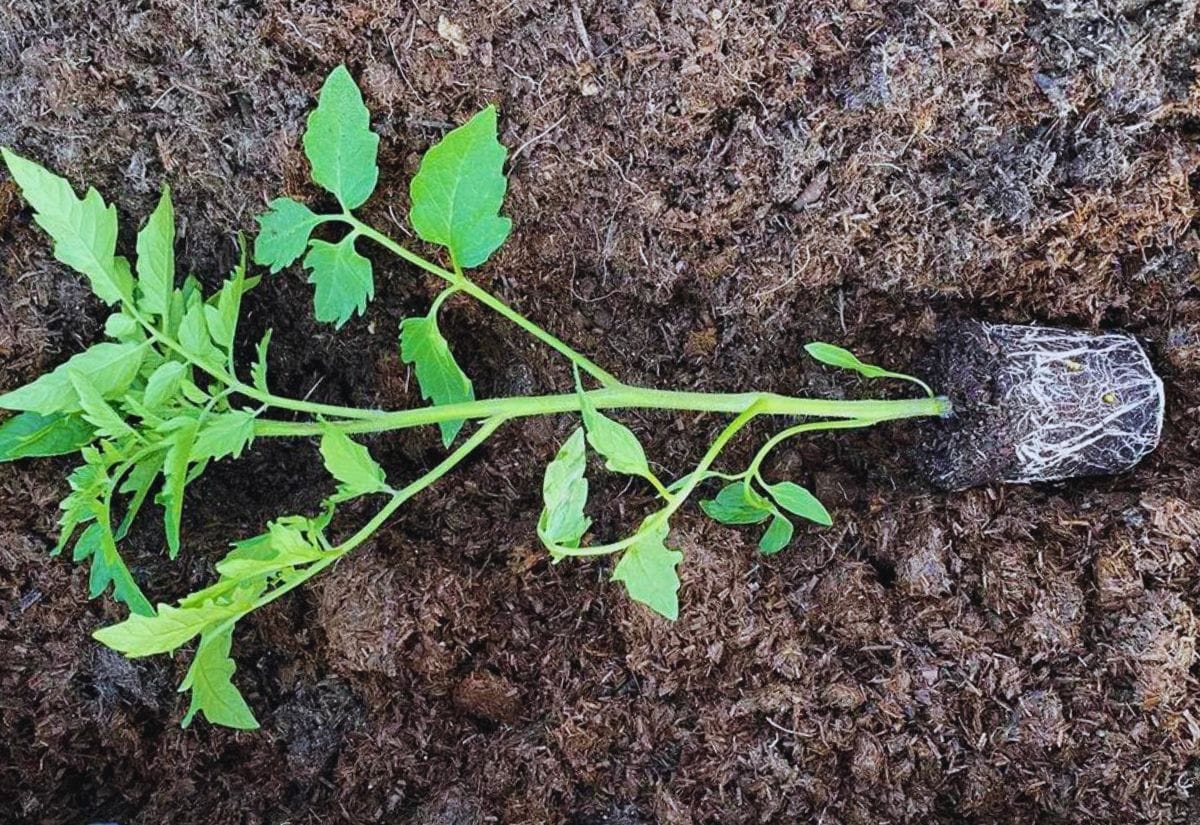
It may sound strange, but planting your tomato seedlings sideways is actually the best way to transplant your tomatoes. This technique encourages stronger root growth as the plant works to right itself, leading to increased nutrient absorption and healthier plants overall. To plant sideways, dig a shallow trench rather than a deep hole and lay each plant on its side, gently bending the stem upwards. The plant will naturally right itself as it continues to grow.

Water Tomatoes Wisely
Water your tomatoes regularly, especially when they are just getting started. Aim for deep, infrequent waterings to encourage deep root growth. I like to use drip irrigation or a soaker hose to keep water off the leaves and reduce disease risk.
Yellowing leaves, particularly near the plant’s base, and soggy soil are symptoms of overwatering. This condition can lead to root rot, a serious issue that deprives the plant of oxygen. In contrast, when plants are underwatered, the leaves droop, look dry, and sometimes even turn brown at the edges and tips. The soil will feel dry to the touch.
Mulch for Moisture and Temperature Control
A layer of organic mulch around your plants does wonders. It retains soil moisture, regulates temperatures, and reduces weed competition. Straw, grass clippings, or shredded leaves are excellent choices. Each has a few pros and cons to consider.
Straw Mulch
Pros:
- Straw mulch helps keep the soil moist, reducing the need for frequent watering.
- It insulates the soil, keeping it cooler on hot days and warmer during cooler nights.
- Straw significantly reduces weed growth by blocking sunlight from reaching the soil surface.
- By preventing soil from splashing onto the plants, straw mulch can help reduce the spread of soil-borne diseases.
Cons:
- Straw can sometimes harbor pests like slugs and mice, which might lead to garden infestations.
- As straw breaks down, it can temporarily tie up nitrogen in the soil, making it less available to plants.
Grass Clippings
Pros:
- Grass clippings decompose quickly, adding valuable nitrogen back into the soil, benefiting plant growth.
- Like straw, grass clippings help retain soil moisture, minimizing water loss through evaporation.
- For those who mow their lawns, grass clippings provide a free, readily available mulching material.
Cons:
- If applied too thickly, grass clippings can mat down and create a barrier that prevents water from penetrating, potentially leading to mold or mildew issues.
- If the lawn was treated with herbicides, those chemicals could transfer to your garden beds, harming your tomatoes.
This is my personal favorite because I can refresh it every time I mow the lawn.
Shredded Dry Leaves
Pros:
- As leaves decompose, they enrich the soil with organic matter, improving soil texture and fertility.
- A layer of leaf mulch can effectively suppress weed growth by blocking light.
- Dried leaves provide excellent insulation against temperature extremes, protecting roots from heat and cold.
Cons:
- Like grass clippings, if not shredded enough, leaves can mat together and form a barrier that water struggles to penetrate, potentially harming plant roots.
- Different types of leaves decompose at different rates, which can lead to uneven mulching effects and potentially smother plants if not managed carefully.
Have you discovered the amazing benefits of leaf mold in your garden?
Practice Crop Rotation
By not planting tomatoes in the same place back-to-back, you can keep your tomato plants healthy and increase their yield. This technique is called crop rotation. Because certain crops can cause soil-borne diseases and pests to become entrenched in the soil, this approach is critical for minimizing their accumulation.
Also, if you grow tomatoes in the same spot year after year, they will eat up all the nutrients in the soil. Soil fertility and structure can be better maintained by following a three-year rotation cycle, which means that plants in the same family, such as tomatoes, should not be replanted in the same soil for that amount of time. During this time, the soil can rejuvenate, and pests and diseases that harm tomatoes are less likely to strike.
Be On the Lookout for Pests and Diseases
Keep an eye out for common tomato pests and diseases. Early detection and natural remedies can prevent most issues.
Common Tomato Pests
Tomato Hornworm
Hornworms cause obvious damage to plants, including chewed or missing fruit, stems, and leaves. The hornworms themselves, large green caterpillars up to 4 inches long with a distinctive horn-like protrusion on their rear, can often blend in with the plant foliage but are noticeable upon closer inspection. Hornworms can also be identified by the presence of small, dark feces on the plant’s leaves or the ground below.
Handpicking is a quick and easy way to get rid of these pests; just keep an eye on your plants and pluck out any hornworms by hand. I prefer to wear gardening gloves when doing this because they are incredibly gross.
Aphids
Aphids are tiny, soft-bodied insects that feed on plants and can be any color from green to yellow to brown to red or even black. They typically cluster on the undersides of leaves and tender new shoots. Signs of aphid infestation include yellowing and curling leaves, stunted growth, and a sticky substance known as honeydew, which can attract other insects and lead to sooty mold growth.
As a first step in aphid management, you can use a powerful jet of water to spray all infested plants. Applying neem oil or insecticidal soap can help with more long-term issues.
Spider Mites
Little pests called spider mites prey on tomatoes and other plants in hot, dry climates. They are so small that they can be difficult to see with the naked eye, but you can see the fine, silky webs they weave on the undersides of leaves, along with visible damage such as speckling, yellowing, or bronzing of leaves. Severe infestations can lead to significantly weakened plants, reduced yields, and even plant death.
Because spider mites thrive in dry environments, one strategy to rid your plants of these pests is to mist the leaves frequently and raise the relative humidity in the area. Another method for reducing mite populations is to wash plants with a powerful jet of water. Insecticidal soaps or neem oil applied to the undersides of leaves—a breeding ground for mites—can be effective against more severe infestations.
Tomato Diseases to Watch For
Blight
Two main forms of blight, known as early blight and late blight, can severely damage tomato plants. Dark, concentric rings appear on lower leaves of plants affected by early blight, which causes them to yellow and drop off at an early stage. Large, unevenly shaped spots on fruit and leaves that quickly rot are symptoms of late blight.
Avoiding blight is the best way to control it. Begin with tomato varieties that are disease-resistant, and make sure the plants get enough air by spacing them out and staking them. Regularly remove any affected leaves or plants to prevent the spread of the disease. It is best to apply copper fungicide in advance to avoid problems, particularly in very humid conditions or when rain is predicted. Another important thing to remember is to not water from above in order to keep the leaves dry and lessen the likelihood of blight.
Fusarium and Verticillium Wilt
Fusarium and Verticillium wilt are soil-borne fungal diseases that affect tomatoes, causing wilting, yellowing of leaves, and eventual plant death.
Fusarium wilt is characterized by a slow but steady yellowing and wilting of leaves, which usually begins at the base of the plant and works its way up. A brownish stain may also appear in the affected plant’s vascular tissues. The symptoms of verticillium wilt are similar to those of fusarium wilt, except that the wilting and yellowing affect a wider area of the plant and the discoloration within the stem is typically less severe.
Prevention is the key to effectively managing these diseases. If you want to minimize your tomato crop’s vulnerability to these diseases, choose disease-resistant varieties. To stop the disease from spreading in your garden, you should remove and destroy any affected plants. Prevention is key to ensuring tomato crops stay healthy because once a plant is infected, there are no effective chemical treatments.
Use companion planting and natural predators to your advantage.
Fertilize Thoughtfully
Tomatoes are heavy feeders, but too much of a good thing can be problematic. Use a balanced, slow-release fertilizer at planting, and then supplement with a low-nitrogen, high-phosphorus formula to encourage flowering and fruiting. These are a few of my favorite organic options for fertilizing my tomatoes:
- Espoma Tomato-tone Organic Fertilizer Why It’s Good: This organic option is favored for its slow-release formula, which provides a steady supply of nutrients. It includes beneficial microbes to help soil health and nutrient uptake.
- Dr. Earth Organic Tomato, Vegetable & Herb Fertilizer Why It’s Good: It offers a rich blend of organic nutrients and is enhanced with probiotics to improve root growth and soil structure, promoting healthy plants and tasty tomatoes.
- Jobe’s Organics Vegetable & Tomato Fertilizer Spikes Why It’s Good: These spikes are convenient and mess-free, delivering a continuous supply of nutrients directly to the roots over time.
- Neptune’s Harvest Organic Hydrolized Fish & Seaweed Fertilizer Why It’s Good: This liquid fertilizer combines fish and seaweed, providing a rich source of nutrients and promoting vigorous plant growth and increased yields. It’s also known for improving overall plant health and resistance to stress.
Harvest at the Right Time
Harvesting tomatoes at their peak ensures the best flavor and nutritional value. Look for full color and a slight give when gently squeezed. Some varieties might continue ripening off the vine if picked when they start to change color. Do you know when to harvest tomatoes and how to preserve them? Check out this post on harvesting and preserving the best tomatoes ever!
Frequently Asked Questions
When you are ready to process your tomatoes into sauces and salsas, you can save time using my pop-to-peel method. This method is the only reason we can process our tomatoes. Here in Maine, they don’t all ripen at the same time, and if we didn’t freeze them as we harvested, they’d rot before we could process them.
And don’t forget to save your seeds for next year’s garden. Trust me, they get better every year if you save seeds.
If you’ve found value in this blog post and enjoyed reading it, why not share it with your Pinterest community? Pin the image below and spread the love!

With these 10 tips, you’re well on your way to growing the most lush and bountiful tomato plants your garden has ever seen. From choosing the right support to knowing the perfect time to harvest, each step is a stride toward a more fruitful garden that will bring joy and flavor to your table.
Now, I’d love to hear from you—what’s your secret to growing the perfect tomato, or is there a tip you’re excited to try out this season?

What you say is true, I will apply tomorrow to get the best tomatoes.
Hi Jessica,
You are right, no garden is complete without tomatoes. I love gardening. Tips are really amazing. I really enjoyed your post. Thanks for sharing.