Composting for Beginners: The Ultimate Starter Guide
My Composting for Beginners Guide will help you change the way you garden. Learn how to turn trash into garden gold in an eco-friendly way.
Regardless of whether you garden indoors or out, you should be composting. All plants benefit from compost. It can seem overwhelming, but I’m going to simplify the process for you. You’ve got your greens, you’ve got your browns, you’ve got your bin, and you’ve got compost. That’s all it takes.
Let me help you find the right greens, browns, and bins for your composting endeavor.
Why Compost?
Using compost to turn kitchen scraps and yard waste into nutrient-rich soil that can greatly improve garden health is an effective and eco-friendly way to reduce household waste. Not only does composting cut down on the amount of trash that ends up in landfills, but it also cuts down on greenhouse gas emissions. It also improves the soil, which means plants grow better without the need for chemical fertilizers.
It is good for the environment and gardeners alike to compost because it creates a cycle that keeps resources from being wasted and improves soil fertility.
Choosing a Composting Bin and Location
There are hundreds of different composting bins on the market, from stationary bins to tumblers to big piles tucked into the corner of your property.
Stationary Bins
If you want to make a large quantity of compost and you don’t mind a little hard work, stationary composting bins are the cheapest and can even be made for free from salvaged materials. This is the type we have. It’s a two bin system made from pallets. Stationary bins require manual turning. They really just serve as a container to hold your materials so they don’t go all over the place. If you don’t want to make your own, you can purchase a pre-made bin for $50-200 depending on the size/capacity.
Tumblers
If you are looking for a more hands-off way of making compost, a tumbling composter is a good option. They tend to have a smaller capacity for a larger price tag, but you don’t need to manually turn the pile. Merely spin the handle a few times as needed. Although they purport to speed up the process of composting, many people complain that rain sneaks into the perforations and causes a wet mess. I haven’t tried one myself. You can purchase a tumbler for $95-250 depending on the size/capacity. They do not have the capacity of a stationary bin.
Location, Location
There are a few things to keep in mind when deciding where to put your composting bin. First, do you have neighbors? They may not appreciate the smell of your rotting organic materials right next to the property line. A well-maintained bin won’t emit much odor, but it’s wise to consider your neighbors when considering a location.
Choose a location with partial sun. The direct sun in the summer will cook the contents and remove all the moisture inside the bin. Full shade in the fall and winter will slow down decomposition to the point where it won’t compost at all.
Be sure to consider convenience. If your bin is hard to use, you won’t use it. Find a location that is near the garden or near the kitchen. If you can place it between the two, even better! Our bin is located at the end of the chicken coop. It’s not as close to the house as I would like, but I can easily access it from the garden. With the coop between the house and the garden, there was no perfect location.
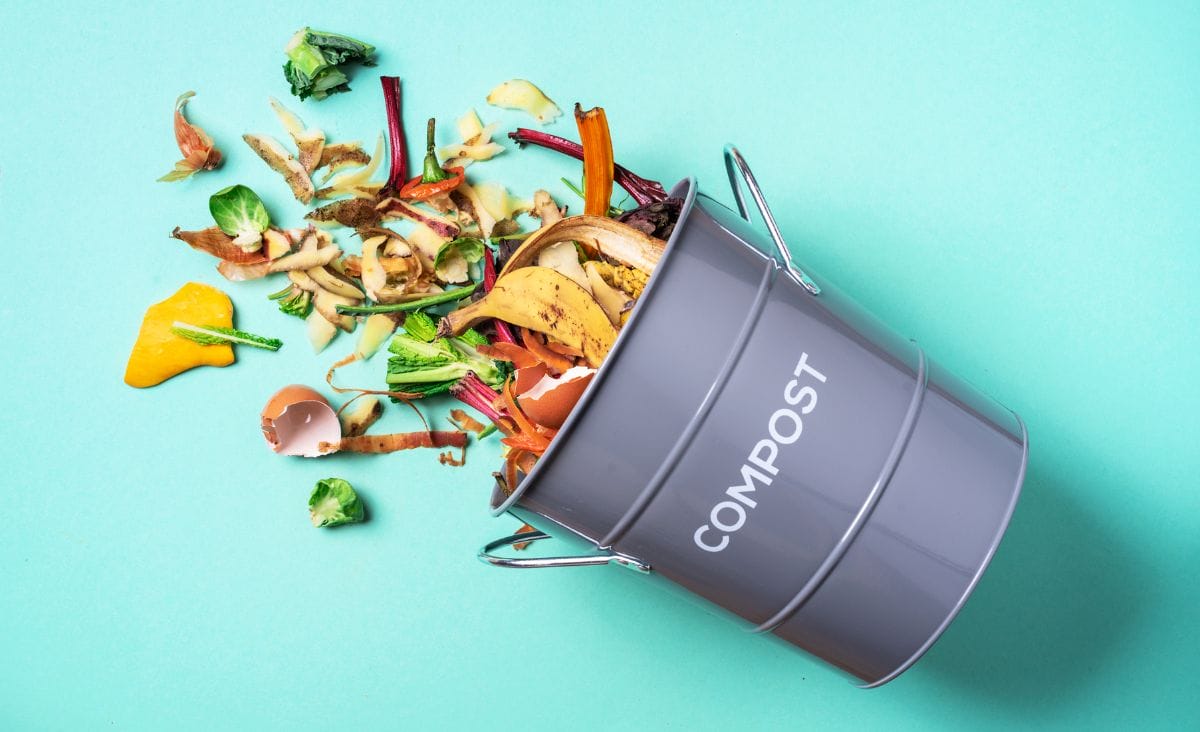
What You Can and Cannot Compost
Now that you know what to compost in, and where your composter should be, let’s talk about what you can and cannot compost. I’m going to make some purists mad, but bear with me. You can compost just about anything that is natural and/or plant based.
You’ll see a lot about greens and browns. Don’t let it freak you out. Everyone has an opinion about the proper ratios of green (nitrogen) and brown (carbon) materials, but I’m here to tell you that there is no perfect ratio. Every brown has a different level of carbon, and every green has a different level of nitrogen.
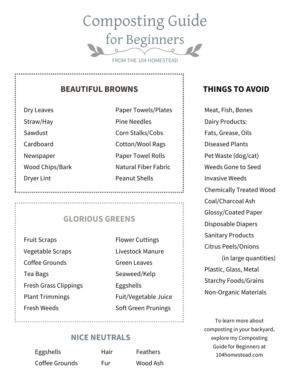
Glorious Greens for Your Compost
These are nitrogen-rich materials.
- Fruit scraps: Apple cores, banana peels, strawberry tops.
- Vegetable scraps: Carrot peels, lettuce, and tomato ends.
- Coffee grounds: Including paper filters.
- Tea bags: Make sure they’re made of compostable material.
- Fresh grass clippings: Avoid treated lawns.
- Plant trimmings: From your garden.
- Fresh weeds: That haven’t gone to seed.
- Flower cuttings: From non-diseased plants.
- Manures: From herbivorous animals like cows, horses, and chickens (but not dogs or cats).
- Green leaves: As opposed to dry, brown leaves.
- Seaweed and kelp: Rinsed to remove salt.
- Eggshells: Crushed to speed up decomposition.
- Vegetable and fruit juices: Leftover pulp.
- Soft green prunings: From garden plants.
Beautiful Browns for Your Compost
These are carbon-rich materials.
- Dry leaves: An autumn abundance.
- Straw and hay: Preferably seed-free.
- Sawdust: From untreated wood.
- Cardboard: Shredded, non-glossy.
- Newspaper: Shredded, black and white print.
- Wood chips or bark: Natural, untreated.
- Dryer lint: From natural fabrics.
- Paper towels and plates: Unbleached, not used with chemicals or greasy foods.
- Pine needles: In moderation, as they can acidify the compost.
- Corn stalks and cobs: Broken into smaller pieces.
- Cotton and wool rags: Natural fibers only.
- Toilet and paper towel rolls: Shredded.
- Old natural fiber clothing: Cotton, silk, wool, shredded or cut up.
- Peanut shells: Crushed.
Nice Neutrals
These items can act as either green or brown, depending on their state or use.
- Eggshells: Generally considered green for their calcium, but act as a neutral in balancing pH levels.
- Coffee grounds: Often categorized as green for their nitrogen content but can be seen as neutral due to their balanced pH and carbon-nitrogen ratio.
- Hair and fur: Can be seen as a nitrogen source but also add fibrous structure like browns.
- Feathers: Similar to hair, providing both nitrogen and structure.
- Ashes: Wood ash in very small amounts can add potassium and phosphorus but should be used sparingly to not disrupt the pile’s balance.
What to Avoid in Your Compost
When composting, certain items should be avoided to prevent attracting pests, causing bad odors, or introducing diseases and chemicals to your compost pile. Here’s a list of materials to avoid putting in your compost:
- Meat, fish, and bones: These can attract pests and create odors.
- Dairy products: Similar to meat, they can attract pests and cause unpleasant smells.
- Fats, grease, and oils: These materials can create a barrier around other compost materials, slowing down the decomposition process.
- Diseased plants: Can spread diseases back into your garden when the compost is used.
- Pet waste (dog and cat feces): Can contain pathogens harmful to humans.
- Weeds that have gone to seed or invasive weeds: Risk of spreading weeds through your compost.
- Chemically treated wood or sawdust: Can leach harmful chemicals into your compost and garden.
- Coal or charcoal ash: May contain substances harmful to plants.
- Glossy or coated paper: Often contains heavy metals or other chemicals in the inks and coatings.
- Disposable diapers and sanitary products: Contain plastic and human waste.
- Citrus peels and onions in large quantities: Some argue they can be composted in moderation, but large amounts might inhibit decomposition and worm activity in worm bins.
- Plastic, glass, and metal: Non-biodegradable materials that won’t break down.
- Starchy foods or grains (in large amounts): Can attract rodents and pests.
- Non-organic materials: Anything that does not decompose naturally should be avoided.
Find the Balance
To have a successful breakdown within your pile, just make sure you are adding a variety of greens and browns.
If your pile just won’t warm up, it’s too heavy in browns. Add some green and turn the pile. Ant infestation is also a sign of a brown-heavy compost pile. Add greens, turn, and hose down the pile. If your pile has an ammonia smell, it’s too heavy in greens. Add some brown and turn the pile. Sometimes your pile won’t warm up because you have too many fresh greens. If you feel like you’ve got enough browns, try adding some dry greens like hair (human or animal) or dried herbs that have lost their flavor. You can also try out urine – it’s seriously a wonderful compost amendment.
Maintaining Your Compost Pile
To get things started, your pile needs to be at least 3′ x 3′ in order to start the magic of breakdown.
Mother Nature does the majority of the work, especially if you’re using a tumbler, but it does require some work on your part. The only exception to this is if you keep your compost bin in an area your chickens can access. You can read about why chickens and compost are like peas and carrots here.
Your compost needs moisture to break down. It should be moist to the touch, but no liquid should come out when you squeeze it. If it’s too dry, you can soak it down with a hose, turning it as you wet it. If the pile is too wet, you can try aerating it by jabbing it with a garden fork and rotating a bit as you pull it back out. In the event you’ve had a heavy rain and the pile is just soaked, use your garden fork to pull the pile apart so it’s not as deep. This allows the air to circulate and dry it out.
If you’re throwing on kitchen scraps, it’s wise to cover them with some brown material (like leaves or straw) to keep bugs down. If you’re throwing in dairy, dig a hole in the middle of the pile and cover it completely. This isn’t as important with a tumbler since they are enclosed, but it’s very important with open piles.
So how long until it’s done cooking?
Your compost is finished when it looks, feels, and smells like rich, dark earth rather than rotting vegetables. When in doubt, give it more time. The length of time is dependent on many variables, like heat, pile size, sunlight, and materials.
Additional composting tips
Want to take your compost from drab to fab? Here are some other pointers.
- You can add worms to speed things up! They can be purchased or acquired from another part of your yard.
- You can add a compost activator if you feel things aren’t happening fast enough. Don’t worry, they have organic options.
- Save leaves from autumn for spring and summer composting. But make sure to save some for leaf mold!
- Store your kitchen scraps in a gallon-sized baggie in the freezer so you can add them in large quantities. This will allow your pile to heat up more quickly.
Frequently Asked Questions About Composting
If you’ve found value in this blog post and enjoyed reading it, why not share it with your Pinterest community? Pin the image below and spread the love!
Turning everyday trash into useful garden materials through composting is a rewarding way to help the environment. Understanding what to compost, using the right methods for your home, and keeping your compost bin in good shape are all things that can help you make nutrient-rich soil that is good for plants and the environment. Whether you live in an apartment or have a lot of outdoor space, composting can help your gardening and cut down on trash that ends up in landfills.
Have you tried composting at home? Share your experiences and any tips you might have for beginners in the comments below!
Hi! Great info, thank you. My compost keeps growing volunteers. Should I stop allowing this? (It was pretty great getting some unexpected spaghetti squash!) and it keeps throwing up tomatoes and sunflowers (bird feeder is nearby). Should I pull these up? I have two sections- one is the one I currently add to and the other I was letting be so I can use it in the spring. This is the one that is growing things on its own.
Can you add rhubarb leaves?
My top tip for composting is to mix it up. For example, mix your kitchen scraps with shredded paper, mix the grass clippings with shredded cardboard.
Most gardens have been materials available towards the end of the year and the green material at the beginning and through summer. Get creative when mixing up your compost heap especially if you don’t have a garden yet!