Turn Kitchen Scraps into Compost with Beginner Vermicomposting
Learn how to start vermicomposting for beginners. Simple steps to set up a worm bin, reduce food waste, and make compost your garden will love.
If you’ve ever tossed veggie scraps into the trash and thought, “There has to be a better way,” you’re right… there is. That better way? It’s vermicomposting… basically letting worms do the work of turning your scraps into rich compost your garden will love. If you’re brand new to the idea of turning waste into soil, start with my full guide on composting for beginners. It explains the basics that make vermicomposting even easier to understand.
I started vermicomposting years ago as a way to reduce food waste and feed my garden without relying on store-bought fertilizers. What I didn’t expect was how simple (and surprisingly fun) it would be. Don’t have much space? Or maybe the thought of worms makes you squirm a little? I promise, this setup is simple and surprisingly rewarding right from the start.
This guide to vermicomposting for beginners will walk you through everything you need to know: how it works, how to start your own worm bin, and how to keep it healthy and productive. Plus, I’ll share real-world troubleshooting tips so you can skip the frustration and go straight to the good stuff, like nutrient-rich worm castings.
What Is Vermicomposting?
Vermicomposting is a method of composting that uses specific types of worms (usually red wigglers) to break down food scraps and bedding materials into a nutrient-rich soil amendment called worm castings. Gardeners call these castings ‘black gold.’ They’re loaded with nutrients and the good microbes your plants love.
Unlike traditional composting, which relies on heat and microbes, vermicomposting is a cooler, more contained process. That makes it perfect for indoor use, apartment dwellers, or anyone looking to compost year-round without a big outdoor pile.
Why Vermicomposting Is Great for Beginners
If you’re new to composting or don’t have a lot of outdoor space, vermicomposting makes it easy to get started. Here’s why it’s such a good fit for beginners:
- It fits just about anywhere: basement, garage, even under the kitchen sink
- When it’s set up right, you won’t smell a thing (seriously)
- No pitchfork-turning required
- You’ll have compost in a 2-3 months, way faster than the usual outdoor pile
- And the best part.. you’ll actually see less food going in the trash
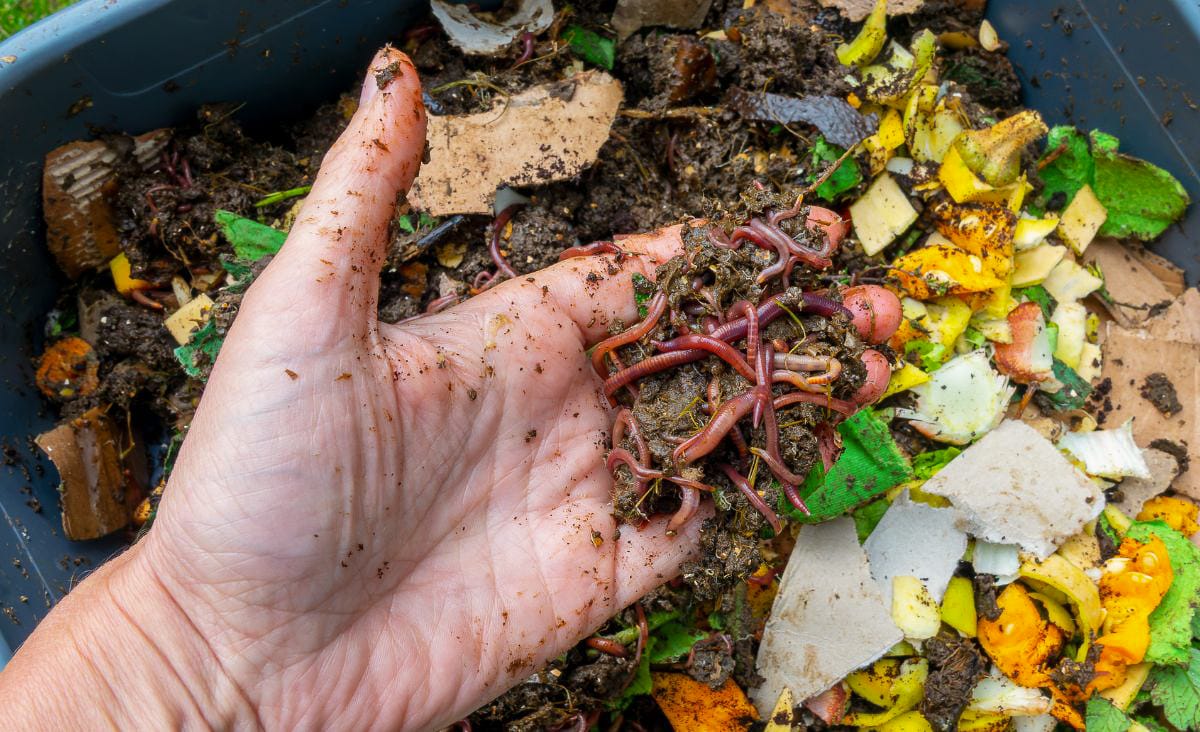
The Best Worms for Vermicomposting
The go-to worm for this is Eisenia fetida. Most folks just call them red wigglers.
These worms:
- Thrive in rich, decaying organic matter
- Prefer shallow environments (like a worm bin)
- Reproduce quickly under good conditions
- Can eat up to half their body weight in food each day
I usually order mine online. Uncle Jim’s Worm Farm has always delivered healthy worms for me. Whoever you buy from, make sure they guarantee live delivery.
How to Set Up a Vermicomposting Bin (Step-by-Step)
You can buy a ready-made worm bin or make one yourself from a plastic tote with a lid. Either way, the setup is the same.
Step 1: Choose the Right Container
For a small household, a 10-gallon tote is plenty to start with. I like these totes because they’re easy to stack and move around (and yes, I’ve grabbed plenty at the dollar store). A dark-colored plastic tote with a tight-fitting lid works great. Drill small holes in the sides and lid for airflow, and in the bottom for drainage (set the bin on a tray or bricks to catch liquid).
Step 2: Add Bedding
Worms need bedding to live in and process along with their food.
Best bedding materials:
- Shredded newspaper (black ink only)
- Coconut coir
- Peat moss
- Shredded cardboard
- A small handful of finished compost (optional)
Get the bedding damp. Think damp dish sponge, not dripping wet. Fluff it to create air pockets.
Step 3: Add Worms
Gently place your red wigglers on top of the bedding. They’ll burrow down on their own to escape the light.
How many to start with? 1 pound of worms (about 1,000) is a great starter amount for a small bin.
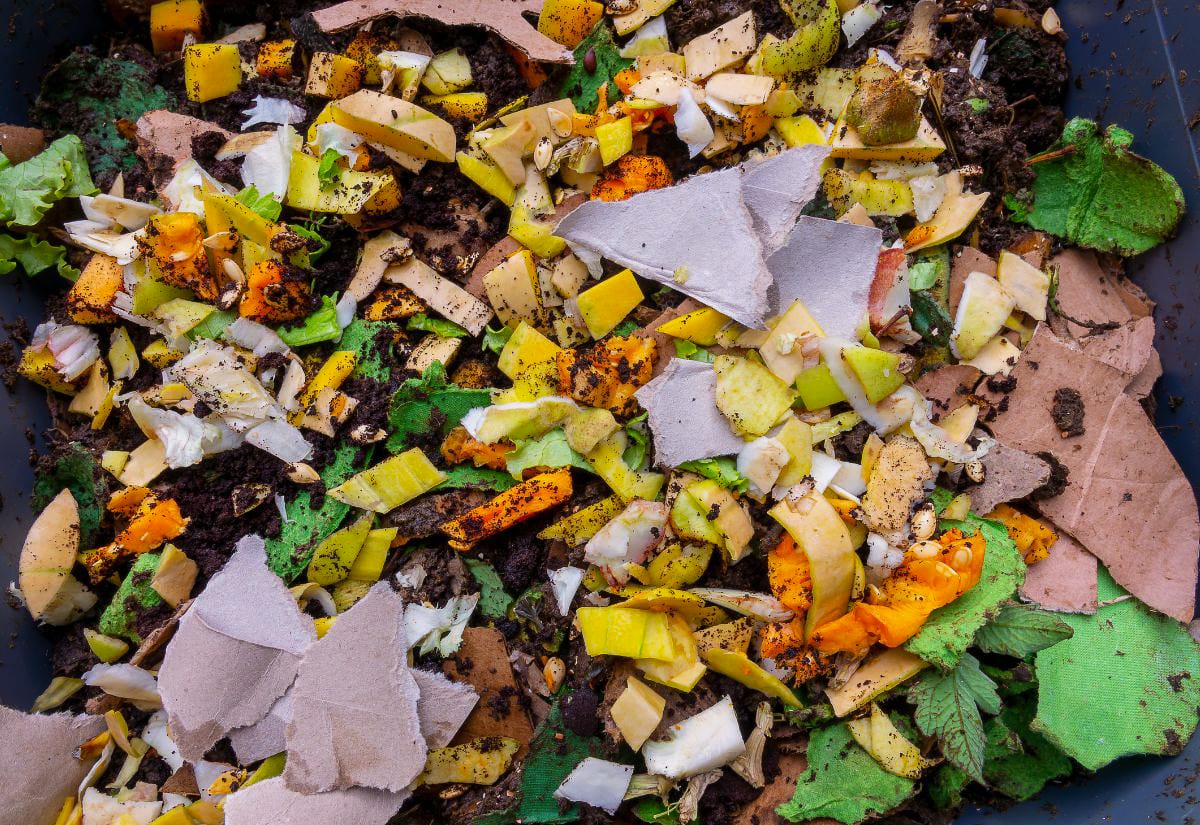
Step 4: Feed Your Worms
Start slow! For the first couple weeks, give your worms time to adjust. Feed small amounts and bury the food in the bedding to reduce odors and pests.
Good worm food:
- Fruit and veggie scraps
- Coffee grounds and filters
- Crushed eggshells
- Tea bags (without staples)
- Bread (in moderation)
What to avoid:
- Citrus or onions (can irritate worms)
- Dairy or meat (causes odors and pests)
- Oily or salty foods
- Animal waste
- Moldy or rotting food
I’ve noticed scraps break down faster if I chop them up a bit before tossing them in.
Not everything has to go into your worm bin. There are also creative ways to use kitchen scraps beyond composting, especially if you cook or garden a lot.
Step 5: Monitor the Bin
Every few days, check moisture levels (bedding should stay damp, not soggy), odor (it should smell earthy, not rotten), and worm activity.
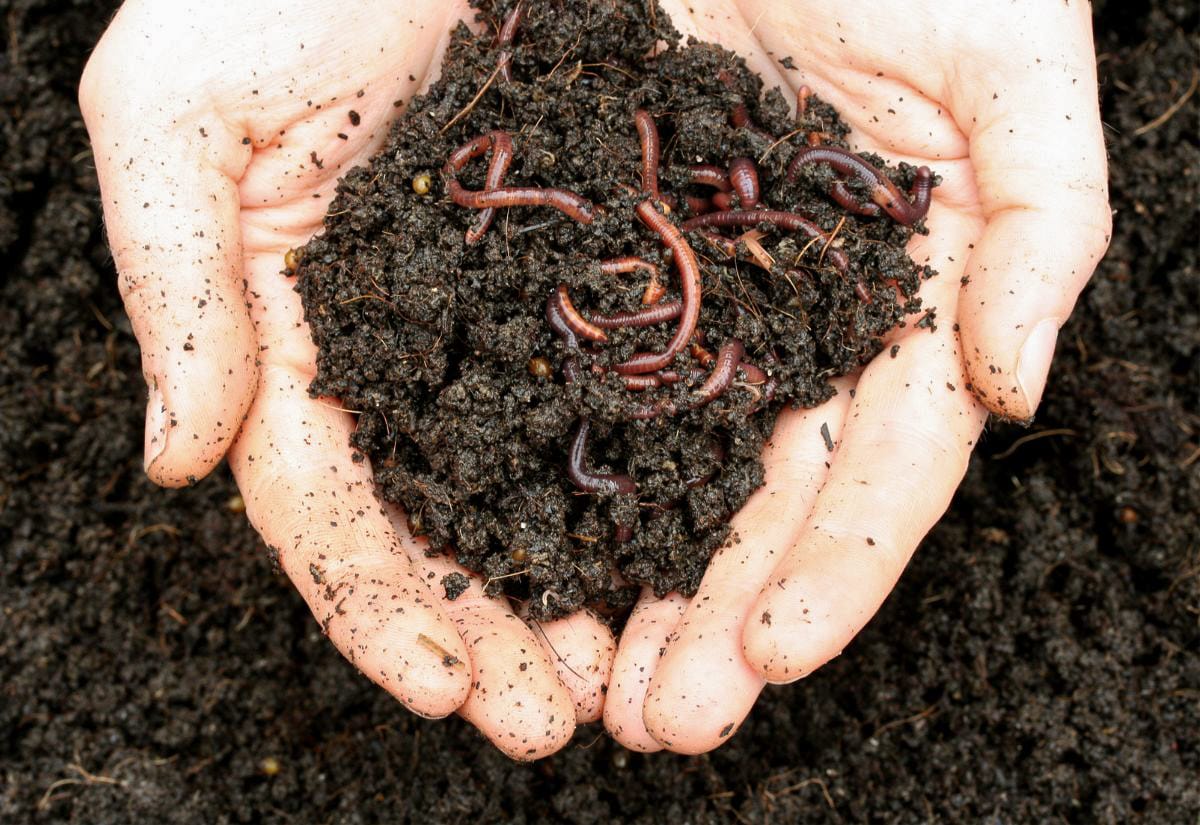
How to Harvest Finished Vermicompost
After a couple months, you’ll notice the bedding turning into a dark, crumbly mix. That’s the worm castings. Here are two simple ways I’ve separated worms from finished compost over the years:
Push & Fill: Push finished compost to one side of the bin and add fresh bedding + food to the other. Over a few weeks, worms will migrate to the new side. Then you can scoop out the finished compost.
Light Sorting: Dump the contents onto a tarp or table under bright light. The worms will burrow down. Scoop off the top layer of castings and repeat.
Using Worm Castings in the Garden
Once your worm bin is up and running, you’ll end up with crumbly, dark compost that’s ready to feed your soil. Here are some of my favorite ways to put worm castings to good use:
- Sprinkle on top of seed-starting mixes
- Mix into potting soil
- Add a scoop to transplant holes
- Brew compost tea for a soil drench
- Top-dress around garden plants or houseplants
If you want to take your soil health even further, you might also like using urine in compost. It’s a surprisingly effective (and free) way to boost your soil’s nutrients naturally.
Troubleshooting Common Vermicomposting Issues
Even with a simple setup, things can sometimes go sideways. Here are a few common problems you might run into and what to do about them.
Pin this guide so you’ll have it handy when you’re ready to start composting with worms.
Once your bin is going, it just kind of hums along in the background. Less waste, more compost, and healthier plants without much effort from you. Once you’re comfortable with worm composting, you can experiment with other soil-building techniques like Back to Eden container gardening or even learn how to use wood ash in the garden safely. Both work beautifully alongside vermicompost to create a balanced, thriving soil ecosystem.
If you’re just getting started, don’t stress about doing it perfectly. Worms are incredibly forgiving. Set them up with the basics, peek in now and then, and before long you’ll have plenty of compost to use.
I’ve been vermicomposting for several years now. I finally made my own bin three years ago and getting ready to try my luck on another.
the vegetables garden looks like a jungle sometimes everything grows large….
my vermin babies have grown tremendously I have no idea how many I have no.
I have a large vermicompost tower going strong. Vermicompost is one of these best forms of compost you can add to your garden. Even if you only have space to make some, that is still much better than none at all.
I want to try making those worm towers that feed directly into the garden. Have you tried those?
I love the idea of vermicomposting in winter! One of these days, I’ll make my own worm bin! 😉
Attainable Sustainable has a great tutorial for a $5 DIY bin. I’ll see if I can track down that link for you. It’s the system I use during the winter when I don’t want to trudge through snow.
Here’s the one by Attainable Sustainable that I was telling you about: http://www.attainable-sustainable.net/make-a-worm-composter-for-less-than-five-bucks/