
Melt and Pour Soap: Getting Started with Soap Making
Want to make your own soap? I’ll show you how! It’s easier than you think! Learn how to make melt and pour soap here and enjoy my recipe.
Welcome to the exciting world of soap-making! Whether you’re a crafting enthusiast or simply looking to add a personal touch to your skincare routine, learning how to make your own soap is a rewarding and creative endeavor.
In this blog post, we will delve into the art of melt-and-pour soap making, a beginner-friendly technique that allows you to create beautiful, customized soaps without the complexities of traditional cold-process methods. We’ll explore the history of soap making, discuss the different types of soap you can create, and guide you through the step-by-step process of using melt and pour soap base to craft your very own Orange and Honey soap.
Get ready to unleash your inner soap maker and discover the joy of crafting your own unique bars of soap!
A Brief History Of Soap Making
Soap making has a fascinating history that dates back thousands of years. The earliest evidence of soap-making can be traced back to ancient Mesopotamia, where clay cylinders dating back to 2800 BC were discovered with inscriptions detailing a soap-like substance. Ancient Egyptians also documented soap-making techniques around 1500 BC, using a mixture of animal fats and ash to create a cleansing agent.
Soap-making spread across the ancient world, with the Greeks and Romans adopting the practice. The Romans are credited with popularizing soap, as they discovered that adding urine (yes, urine!) to soap production increased its cleansing properties. Soap making became an important trade during the Middle Ages, and soap makers formed guilds to regulate production and maintain quality.
In the 18th and 19th centuries, advancements in chemistry led to the discovery of new soap-making techniques. The invention of modern processes, such as the discovery of sodium hydroxide in the 19th century, revolutionized soap-making by enabling the production of harder, more long-lasting soaps.
Today, soap-making has become a popular hobby and a thriving industry. While traditional methods of soap production still exist, modern technologies have made soap-making more accessible, efficient, and customizable. From traditional cold-process soaps to easier melt-and-pour techniques, soap-making continues to evolve and delight enthusiasts around the world.
What Type Of Soap Should I Make?
There are two types of soap to choose between. The type you choose depends on your comfort level and what you want to achieve as a final product.
Traditionally Made Cold-Process Soap
Cold-process soap refers to a traditional method of making soap from scratch. It involves combining oils or fats with an alkali, typically sodium hydroxide (lye), through a chemical process known as saponification. This process creates soap molecules and glycerin.
To make cold-process soap, the oils or fats are heated together and mixed with a lye solution. The mixture is then stirred until it reaches a trace, thickening to a pudding-like consistency. Colorants, fragrances, and other additives can be incorporated at this point. The soap is then poured into molds and left to cure for several weeks, allowing it to harden and fully saponify.
Cold-process soapmaking allows for a wide range of customization, as different oils and additives can be used to create unique formulas with desired properties, such as moisturizing, exfoliating, or scenting. However, it requires careful measurement and understanding of the saponification process, as working with lye can be potentially dangerous if proper safety precautions are not taken.
Although the cold-process method takes longer and requires more skill compared to melt-and-pour soap making, it offers soap makers more control over the ingredients and allows for endless possibilities in creating personalized bars of soap. In fact, my goat milk shampoo bar recipe is incredibly popular.
Why I Chose “Melt And Pour” Over Cold-Process
Melt-and-pour soap is generally considered easier than cold-process soap for several reasons.
These bases are readily available and pre-made, eliminating the need to handle and measure lye. This simplifies the process and reduces the risk associated with working with lye. These soap bases are typically safe to handle without any special precautions.
Melt-and-pour soap requires minimal curing time compared to cold-process soap, which may need several weeks or even months to cure fully. After pouring your finished product into molds, you can enjoy it within a few hours.
While cold-process soap offers extensive customization options, melt-and-pour soap still allows for a wide range of customization with the addition of colorants, fragrances, and other additives. This makes it a versatile option for creating personalized soaps without the extra effort and time involved in cold-process soapmaking.
Overall, melt-and-pour soap offers a quicker and simpler method for creating homemade soaps, making it an ideal choice for those who are new to soap-making or prefer a more straightforward process.
How to Use Melt and Pour Soap Base
Our Earth’s Secrets has a wide variety of bases to choose from at affordable prices. Shea butter soap base is easy to find and suits most skin types. They also carry goat’s milk, coconut milk, clear glycerine, oatmeal, aloe vera, and hemp seed.
Ultimately, the right melt-and-pour base for your soap will depend on your personal preferences and the needs of your skin. Experiment with different bases to find the one that suits you best.
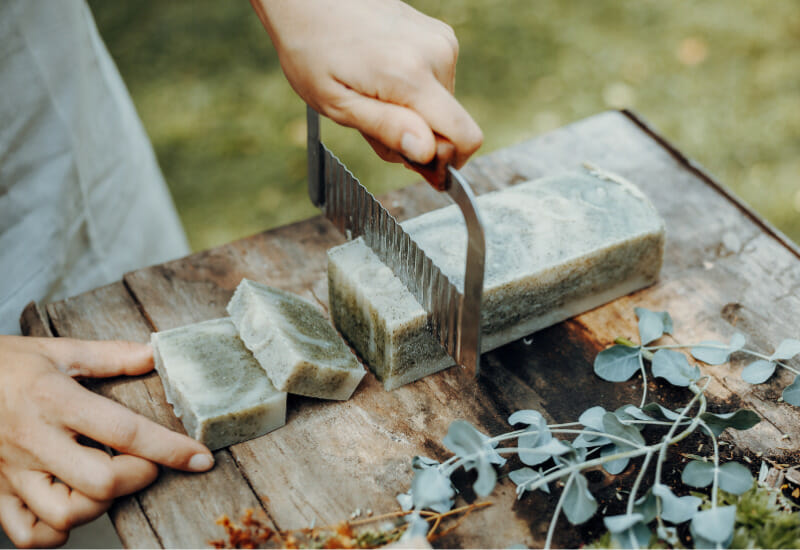
Chop the Soap Base
Once your soap base arrives in the mail (if you’re like me, you’ll be tracking it like a hound), just chop it up into little cubes. I use that term loosely, as many break into pieces when you chop. It’s completely okay! You just don’t want to try and melt down a one-pound block because it would take forever. If you follow a recipe like the one I’m providing below, you’ll want to measure your soap’s weight.
A digital kitchen scale works really well for this. Here is the one I use. If you are a free-spirit who wants to make whatever feels right, just chop until it looks like you have as much as you want.
Melt the Soap Base
There is one rule and two suggestions for the melting process of melt and pour soap.
The rule is that you cannot heat it directly on the heat source if you are using a stove. It will scald the base, which won’t affect usability, but it no longer looks pretty and always smells a bit off. You want to create a double-boiler system, which brings me to my first suggestion.
You can use a double boiler, but they can be hard to pour when you prepare to add your soap to the molds. I use a large 4 cup Pyrex measuring cup with a lid in a little saucepan. The spout makes pouring much easier.
Suggestion number two is to heat slowly. You can’t rush perfection. I like to use medium-low heat on the stovetop. It makes the soap creamier, and the creaminess shines through in your finished product. Many sites suggest zapping your soap base in the microwave to melt it. You can, but I would caution against it. I’ve tried, and despite following the instructions, I’ve scalded more soaps than I care to waste. Again, you can’t rush perfection; even on the stove, it doesn’t take long.
Customize the Soap Base
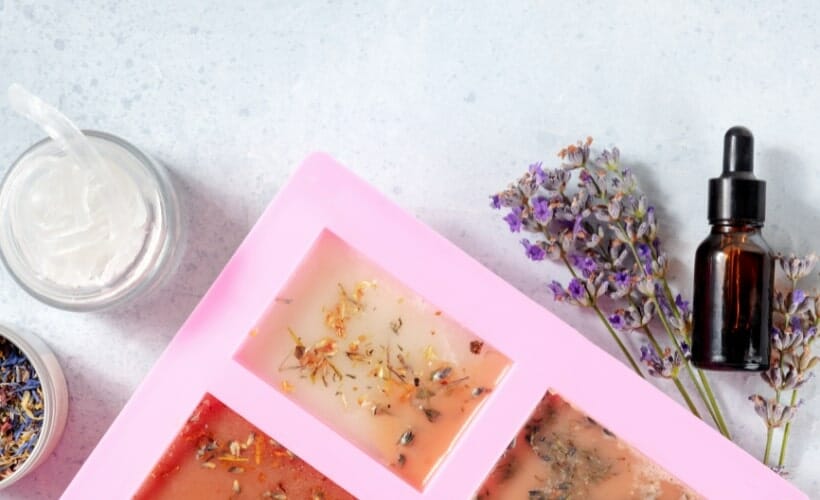
This is the fun part. You have a beautiful, creamy, melted soap base on your stove. It’s a canvas just waiting for the artist. The possibilities are endless. Colors, fragrance oils, natural additives, and so much more can be added. I know some moms who use a clear soap base and suspend bath toys for their kids inside the soap. I love to use up my soap scraps by floating them inside a clear base. You can layer your soap so each layer has a different scent and/or color. You can make your soap the masterpiece you want it to be.
Pour the Soap Base
Here is the last step, as the name indicates. Just pour your melted masterpiece soap into a mold of your choosing. It can be a mold you purchased or one you created.
Once you’ve poured it in, just spritz it with rubbing alcohol. Spraying your handmade soaps with alcohol removes any bubbles from the surface. Wait 4-8 hours before removing your finished bars from the molds. That’s something you can’t do with hot and cold process soaps that take days to weeks to cure.
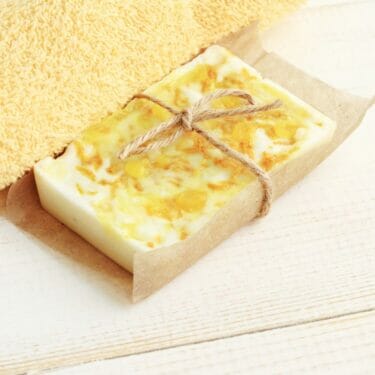
Recipe For Orange & Honey Melt And Pour Soap
Indulge your senses with this delightful Orange and Honey Melt and Pour Soap recipe. Made with a creamy goat milk melt-and-pour soap base, this soap combines the invigorating scent of oranges with the skin-loving properties of honey and almond oil. The goat milk base provides a rich, moisturizing lather, perfect for pampering skin. This easy-to-follow recipe allows you to create personalized soap bars that are visually appealing and nourishing for your skin.

In a double boiler, melt the soap base using medium-low heat, stirring occasionally to ensure even melting. Once the soap base is completely melted, add the tablespoon of honey and stir until well combined. Add the almond oil and essential oil, and continue to stir until the mixture is thoroughly blended.
You can add any natural colorants or exfoliants at this stage if desired.
Pour the mixture into soap molds of your choice. If there are any air bubbles on the surface, spritz them with rubbing alcohol to remove them. Top with a sprinkling of dried orange zest if you so choose. This will add an exfoliating surface to one side of your soap.
Allow the soap to cool and harden completely in the molds. This typically takes around 4-8 hours. Once hardened, carefully remove the soap from the molds and enjoy your homemade goat milk soap bars!
If you’ve found value in this blog post and enjoyed reading it, why not share it with your Pinterest community? Pin the image below and spread the love!
Melt-and-pour soap-making offers a beginner-friendly and accessible way to create custom soaps without the complexities of traditional methods. Whether you’re a soap-making enthusiast or simply looking to add a personal touch to your skincare routine, this rewarding and creative endeavor allows you to unleash your inner soap maker and craft unique bars of soap that are both visually appealing and nourishing for your skin.
What is your favorite soap-making technique, and why? I’d love to hear about your experiences and preferences in the world of soap-making!
Orange & Honey Melt & Pour Soap with Goat’s Milk Base
This post may contain paid links. If you make a purchase using the links in this recipe, I may earn a commission.
Equipment
- 1 Large Measuring Cup
- 1 Kitchen Scale
- 1 Spoon for Soap Only preferably silicone
- 4 Soap Molds
Ingredients
- 1 lb Goat Milk Soap Base
- 1 tbsp. Honey
- 1 tsp. Almond Oil
- 10-15 drop Orange Essential Oil or citrus of your choice
- Dried Orange Zest optional
Instructions
- Chop the goat milk melt and pour soap base into small cubes for easier melting.1 lb Goat Milk Soap Base
- In a double boiler, melt the soap base using medium-low heat, stirring occasionally to ensure even melting.
- Once the soap base is completely melted, add the tablespoon of honey and stir until well combined.1 tbsp. Honey
- Add the almond oil and essential oil, and continue to stir until the mixture is thoroughly blended.1 tsp. Almond Oil, 10-15 drop Orange Essential Oil
- Optional: You can also add any natural colorants or exfoliants at this stage if desired.
- Pour the mixture into soap molds of your choice. If there are any air bubbles on the surface, spritz them with rubbing alcohol to remove them.
- Sprinkle bars with orange zest.Dried Orange Zest
- Allow the soap to cool and harden completely in the molds. This typically takes around 4-8 hours.
- Once hardened, carefully remove the soap from the molds and enjoy your homemade goat milk soap bars!